
Hi All.
ONE WEEK FROM TODAY IS … THE DAY. Anybody needing some last minute, quick little Holiday accents? C’mon, it’s OK to admit it. Everyone has had that dilemma at one time or another … you have most (or almost) everything you need … BUT it just hasn’t all come together yet.
MAKE IT EASY ON YOURSELF. Let me help with some easy AND economical projects, most of which can be done in 15 minutes or less. Just don’t wait until 15 minutes before your guests arrive, to do them … the night before would be better!
ALL YOU NEED IS … a roll or two of holiday wrapping paper, some ribbon, twine or pretty string, a few unbreakable ornaments and one or two minor items that you’ll probably have around the already. If not, a quick run to the closest Big Box Store will do the trick. So …
HERE WE GO.

Dress up a smaller window … YES, EVEN IN A BATHROOM!

Above is everything you need.
1. TENSION ROD
This is an adjustable little curtain rod. You set it’s length to just a bit wider than your window opening. A spring inside allows you to then push it into place in the window, and the tension holds it there.
2. ORNAMENTS
Using unbreakable ornaments is best. Use an odd number so you have a center piece for balance.
3. RIBBON, TWINE or STRING
I used narrow, paper ribbon in a copper color, to coordinate with the rest of the project and room.
4. ROLL OF WRAPPING PAPER
You won’t need the entire roll, but you have to use rolled paper as opposed to folded, flat sheets.
FIRST, adjust the rod to fit your chosen window. Then decide how far down from the top of the window, that you want your paper to show.
NEXT, cut your paper: Make the length the same as the length of your rod. Make the width double the amount you want showing.
NOW, fold over each end on the long sides, about two inches or so, folding the excess to the back side of your paper.
NEXT, lay out your ornaments on your work table. The center one is your main ornament, and should hang from your rod, either shorter than, or longer than your side ornaments. EXAMPLE: My center piece is longer, and in a different design than the others. Then, balance one on each side of your center one, then two more and so on. Once I had my arrangement, I then cut pieces of ribbon, accordingly, to how far they would hang down from the rod.
NEXT, tie one end of ribbon to the ornaments and the other to your rod, and hang rod in window.
FINALLY, just fold your wrapping paper over the rod until you have the right amount showing in front. Gently pinch a fold in the paper at the top of the rod, to better keep it in place.

#2 PAPER/RIBBON PROJECT
This one doesn’t even take 15 minutes, it’s SO EASY and QUICK.
Below is the credenza featured in the previous post. See how much more festive it looks with this easy addition.

All you need is
1. WRAPPING PAPER
2. RIBBON
3. DOUBLE SIDED TAPE or GLUE
Use tape OR glue with paper and cloth ribbon.
Use glue only with metallic and/or wired ribbon (the tape doesn’t adhere to the metallic ribbon)
Just, measure the length and width of paper you want for your table. Fold an inch or so on the long edges, to the back or underside of your paper. Then, adhere ribbon to the hanging edges and done!

TWO MORE !
EASY TABLESCAPE CENTERPIECES
I’m always advising to use what you already have. It also works at Christmas.
Here’s the green one featured in our last post. Just a big glass bowl, a plant, some ornaments and wrapping paper ( also a fabric remnant ). It’s so easy you don’t need instructions.
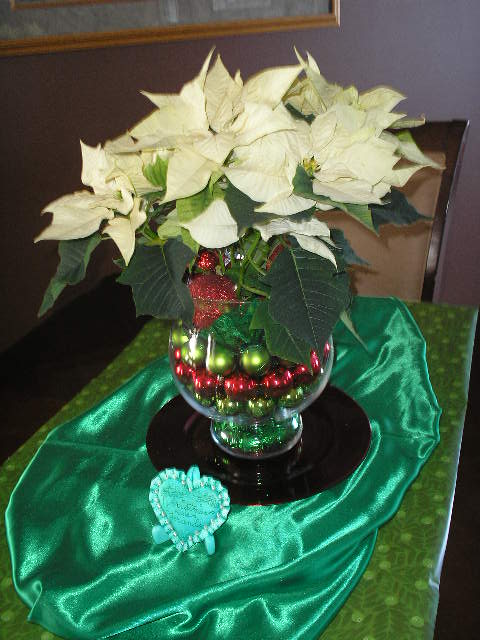
REMEMBER Christmas doesn’t always have to be red and green. I have lots of browns, coppers and other metallics in my home. So I put this together.

I began with a beautiful copper and gold wrapping paper (same as on the window treatment)
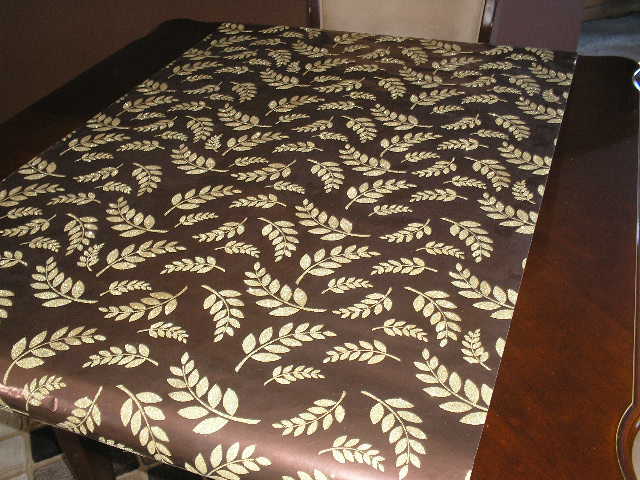
Then I added the runner from a Thanksgiving project.

In this last shot I tried a big, old rusty star with it. Haven’t decided if it stays or goes. Except for the ornaments in the vase, these are everyday items … just combined differently and dressed up for the holidays … that extra SPARKLE.

Now, as they say … ONE MORE FOR THE ROAD
If you’ve got BOOKS and WRAPPING PAPER … you’re set to go. And you can set the timer for 15 minutes!

I have several very pretty holiday books that I display as is. But to add color here and there, I cover others. This is a Christmas book, but Martha on Blue doesn’t fit my scheme this year.

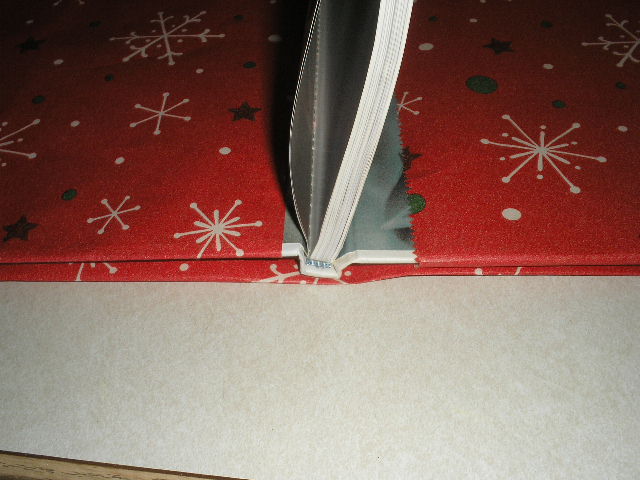
First you need to correctly size your wrapping paper. Follow the instructions below.


Open your book and slide the tube (pretty side up) onto the cover.

Wrap around the front, spine and to the back edge.

Now you’re almost done. Slip the open tube onto the back cover.


Now you’re finished.
Don’t waste precious time trying to wrap every single book. Just do a few, in a few sizes and different papers. Then use them wherever you need color and Christmas!

Whew, a long post! It will probably be easier to print out at least the book cover section. There will be one more before Christmas … but don’t worry … just a short one!
Dearest Readers, as the holidays draw near, I wish for all happiness, joy and peace in this special season, no matter your beliefs or celebration reasons. Stay safe and warm.
As always, try not to stress, but just start.
Later – Cheryl
This original article “Last Minute Holiday Projects … in 15 Minutes or Less” appeared first on Artzzle.com. No included content or photography can be used elsewhere without specific permission from said originators.
Copyright © 2013 Artzzle All Rights Reserved
