
What are we crafters and DIYer’s always on the hunt for?
Besides FREE stuff, I mean.
Something we just cannot find enough of.
C’mon, you know this one.
GRAPHICS of course! And yes, free graphics, right? No royalty or fees.
Well, I have em’ for you . . . tons of them even!
Just visit THE GRAPHICS FAIRY
and enter a wonderful world of vintage graphics.
Everything from fonts to flowers, birds to children, all kinds of pretties.
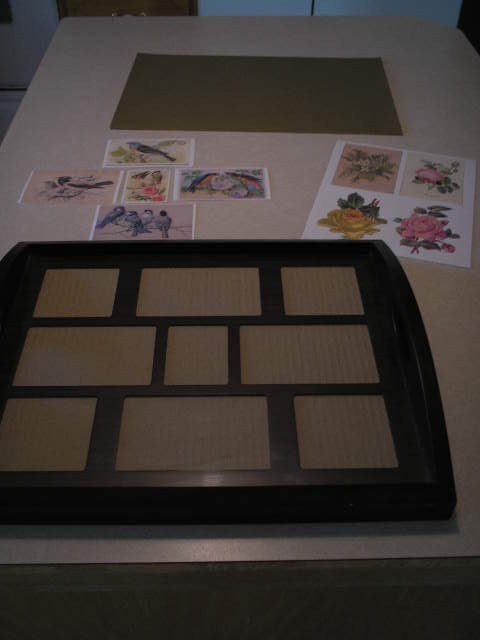
Last summer, I found this brand new wooden tray at a garage sale for $3.00. It had a dark finish, which I liked, and a glass insert on the tray. Ooh, but it gets better, because it also has a matted sheet . . . you know, one of those multiple photo cutout frame dealies. I wanted a quick, clean project for today, and I still hadn’t done anything with my tray. I was also trying to develop an idea for Mother’s Day. My mom isn’t here any longer but I was thinking about all the things she loved.

Long story short. I headed over to Karen’s place at The Graphics Fairy and searched for flowers and birds and nature offerings. It was difficult to decide on favorites because there were so many beautiful options, but I chose birds and flowers . . . in honor of Mom. All I did was copy them onto my desktop. Then I printed them, sizing each down close to the openings in my frame mat. Some couldn’t fit just right, so I used a coordinating sheet of craft paper to back the frame and fill in where needed.

A couple years ago, Hubs and I took an old chair apart and made a little bench. Our tray sets atop that and we use it as an end table most of the time. It’s double duty and we can always remove the tray and have extra seating!
TIP: On a plain tray with no photo mat or glass, you can decoupage some beautiful graphics on, let it dry completely (let it sit for a day or two) and put a piece of clear vinyl contact paper over top.
Hope you enjoyed today’s idea. Your comments are always welcomed! (hey, I love em 🙂 )
Later – Cheryl
***
This original article “Marvelous No-Mess Project” appeared first on Artzzle.com. No included content or photography can be used elsewhere without specific permission and accreditation.
Copyright © 2013-2014 Artzzle All Rights Reserved

I love the Graphics Fairy. My daughter and I printed out bird pictures and made a bunch of crafts for my sun room. I LOVE your tray Cheryl!
Thanks, Gloria. The theme is something my mom would like. Actually, her style AND mine lean towards more modern subject matters. But I just couldn’t resist this genre for the tray!
I have never visited the Graphics Fairy, but I should! I’m always hunting for the perfect picture and it sounds like she has many to choose from! Thanks for popping by and leaving a comment on my post…I did not realize you were a decorator/ stager! What a fun job!
Your work today was great. People don’t always read the ABOUT page, but it tells more of what I do. Since we’ve moved to this rural area, north of the Twin Cities, there isn’t much call for staging or styling work though, and I miss it. I thought you did a very nice job on your friend’s home. I know it will lead to a quicker sale.
What a lovely finished project! And thanks for the lead to the Graphics Fairy, for if/when I have time again for creative projects. The most I’m able to do these days is a little hemming or alteration of favorite clothes that are getting too big as I (finally) lose weight 🙂
Thank you. Must be nice to be able to “take-in” clothes instead of having to get bigger things . . . like me 😦
Your tray looks so pretty! I love the way you arranged the images! The Graphics Fairy is awesome, isn’t she?
The GF is such a fun place. But I’d also like to find a “modern version” of her site too!
Pingback: Beautiful DIY Serving Tray - Reader Featured Project - The Graphics Fairy
Pingback: My 1st . . . “I’ve Been Featured” | Artzzle
I really love what you did. I have a wooden, unfinished tray but its just plain inside. Can I still do what you did? Decoupage or something? I have really neat pictures of birds and id really love to do something with this tray. Any ideas from you or someone who may be reading this? Im in awe of your wonderful work. Not that you consider it work, maybe a better word would be ART. Ty for sharing. pug.master@comcast.net
Thank you, Cybil. YES, you could just decoupage images onto the tray, but if it is raw wood, you might want to prime it first. You wouldn’t absolutely have to though.
Whatever media you use, ModPodge or white glue, just be sure to set the tray aside until it is completely dry. I would wait a couple days to be sure. Then you could either seal it or . . . what I would try, would be a clear sheet of contact paper vinyl over the top, so you can use it for serving. Just smooth the vinyl out well, and possibly put some heavy books on top for a while.
Good luck with your project. You can send photos of it to me on Hometalk … just click the button in the right margin on the home page of Artzzle.
Thanks for the tips. Im so happy I found your page. When I finish it, I will show you how it came out. BTW…Im okay with criticism. Lol 🙂 Sincerely, Cybil Lynch
This tray is especially beautiful to me because of my love of birds and flowers. i’ve got the bird part down just fine but seem to find love alone won’t coax flowers to love me in return. That’s why GF is important to me. The flowers here won’t fade away. Thanks for sharing.
Gloria, Spring is pushing out in full force, so we’ll all have the real flowers and birds soon. But true, Graphics Fairy has been a big help through this past winter! Thanks for stopping by.
Pingback: 14 DIY Serving Tray Ideas - The Graphics Fairy