
Hi guys. It’s a bright, sunny day, finally! Lot’s of gloomy, doomy, chilly days this past week. Bad for energy and ambition, but we managed to crank things up anyway. Had to force ourselves because all the inside days were great for projects, and as usual we have plenty of those available. Today’s feature wasn’t really too difficult OR expensive. The biggest requirements were some elbow grease, a little time and a LOT of patience.
We have the normal countertop areas, the kitchen and bathroom. Our house is a standard build, and our tops were flat formica, edged with wood trim. Instead of one piece with a raised lid against the wall, there is a separate wood/formica strip thingy that was applied on top, against the walls. This is used quite often in our area up here, but not much when I worked with builders in the Twin Cities areas.

When new, it looks fine and is livable. But after not too much time at all, the caulking discolors and comes loose, and shortly after that, because of moisture I guess, the entire wooden piece begins pulling away from the wall. All in all, an unattractive, non-functional piece of . . . (I’ll be nice here) work.
Hubs and I plan to install a pretty tile backsplash at some point. Presently, the dream look isn’t affordable, so I was on the search for other options. As a former military wife, I had numerous quick and easy ways of sprucing up the many rentals we occupied. One product used frequently was contact paper. It was a newer product then, and I fell in love with it’s bright, colorful designs and wipe-able surface. AND it was affordable. What’s not to love.
I began resourcing in stores and online. Today’s CONTACT brand wasn’t offering what I needed. Our plan was to run the paper in two, long strips, horizontally, rather than a series of short, vertical pieces (as you would with wallpaper). I needed a roll width of about 20” and contact rolls were only 18”. Also, I found no pattern in stores that was modern enough for the look we wanted. Online, the selection was only a tad better, more expensive too, and added shipping costs. I considered going with a fabric/starch technique … but that’s lots more work and time consuming, AND I would have had to do several layers of sealer to have it work effectively on a backsplash.
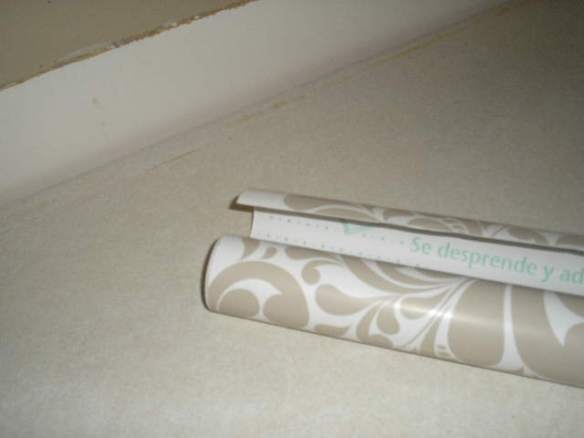
AND THEN … I found a vinyl adhesive made by DUCK Brand. There were only two or three patterns at Wal-Mart. None, in a perfect situation, would have been my first choice. One design was more than tolerable, affordable at $9.89 a roll and I only needed one. More importantly, it was approx. a 22” height, which was perfect.

We began the prep work by removing the already loosened wooden back trim pieces. Perhaps these are so popular because their nearly two inch depth hides a lot of mistakes and builder sins. Below shows the huge bowed gap we found between the wall and counter, under our kitchen window.

That cruddy strip in the middle is actually the gap. You could stick all four fingers into it. A problem we would have to deal with later.
Now, I used Goo Gone to loosen the adhesive marks left on the counter top, then carefully scraped it away.

Next, the walls were sanded to remove layered paint buildup. The walls were washed down well, with a touch of dish soap on a dampened rag.

That was followed by a patch to any bad spots on the walls, and when dried, a final good sanding and wipe down.

Next we painted the area previously behind the trim piece. It had remained the builder white, but the walls were darker now. This would have shown through the contact paper so needed to be one color. Looking closely at the photo below, you can see how the white lower part of the wall shows through when the contact paper is held up.

We began on the less visable wall, our hopes being that by the time we got to the primary wall, we’d know better what the heck we were doing.

Once the paper was up, Hubs worked on a way to hide that big old gap. We simply bought quarter-round, primed pine cove at our True Value. He cut it to size. I painted it to match our upper cabinets and he installed the pieces. Below you can better see the cove trim. Hubs used his brad nailer and adhesive to adhere the wood to the wall.

We’re happy with the results and . . . very happy . . . that the project is done!

So, there you have it. Our next project is much bigger. We’ll be finishing our lower level kitchen cabinets. As you can see in the pictures, our uppers and island are done, but the bottom cabinets are still in the builder’s basic orange oak.
Meantime, don’t stress about a project, just start one!
I’ll be back soon.
Later – Cheryl

You did a great job;a lot of work but result was well worth it.Will call you later.
Joyce
Thanks. Now if only the rest was finished 😦
Love this look!!
Are you coming up this summer to see it in person?
Wow, that looks great! I can’t wait to see it with the lower cabinets completed.Fabulously creative idea, Cheryl, as usual!
Thanks Kim. We’ve started on the lowers. We decided to remove the old dishwasher … permanently. Hubs pulled it out, capped everything off, and is building a cabinet for that space. He’ll put in a false back, that can be easily removed if anyone ever wants another dishwasher. I don’t mind going without and will REALLY like a pull out for pans!
Nice! Great idea!
You know us, C H E _ _ I mean, economical. Can’t wait to get everything else finished! C’mon up and see us!
This is lovely, Cheryl! Can’t wait to see the bottom cabinets finished too. The top cabinets are gorgeous and match your new backsplash perfectly!
Thanks, Amy. Paint is from our local True Value store; top color is “cake batter” and lower cabinets will be “kayak”. Our island (not shown) is already in the darker (mid-hue range) color. Our family room opens directly off the kitchen, and walls are kayak; woodwork cake batter. The backsplash match wasn’t planned, we just happened to find that paper. Glad you stopped by 🙂
Wow that came out great. Will the contact paper last a long time?
Thanks, Donna! This is the first DUCK Brand paper we’ve used. I have no doubt it will hold up because it’s even a bit thicker than Con-Tact brand. CT in previous apartments held up VERY well. Keys are, as you apply the paper 1. take care not to stretch the paper and 2. smooth out all bubbles as you apply it. It’s very easy to keep clean, just a quick wipe with a cloth and some dish soap; no harsh chemical cleaners and no soaking wet rags on the seams.
I’ve got oak doors I’d like to paint do you have to sand them first because I’d like to just paint over?
Hi, Charlotte! Does the wood have any varnish or sheen? If so, you probably should give it a light sanding before you paint. On our cabinets we use a Rustoleum kit, which has a liquid degreaser that removes grime and dulls any remaining glossy finish. You don’t have to sand with that. Unless you have a lot of woodwork and doors to do, the kit might be cost prohibitive for you. A light sanding and rub down with a damp cloth is probably the best route for you.
Let me know what you choose to do and how the project turns out 🙂
I love the way the adhesive paper looks!! What a great idea – I used the same pattern on my quilting table but it doesn’t look nearly as good as on your walls!!
I like the DUCK paper. We did two more smaller projects too. Just haven’t gotten to posting them yet. Thanks for stopping over 🙂
Pingback: Kitchens, Cousins and Cabinets | ARTZZLE