Purple . . . for Autumn??

Each week things improve and recently a bit of ambition struck.  I decided to paint my dining room area.  It’s an open space between the living and family rooms.  There are two smaller walls and one large, and so far the large, accent wall and one small area are done.

Hubs was a wonderful assistant and made things easier.  Odd as it may sound, the most difficult part of the project was deciding what color to choose.   In fourteen years, these walls have gone from the builder beige, to a deep taupe, a warm burgundy, a deep blue/green and most recent, a deep, warm brown, seen below.

OLYMPUS DIGITAL CAMERA

Lighting gives photos glare, but you can see the brown.  The print is something my husband and I picked out for that wall when we first moved in to this home.  He is very patient with all of my changing and rearranging, but the one and only time I moved the print to a different room . . . well let’s just say, he nicely requested made it clear he wanted it to stay where it had been.  And I’ve been fine with that.

Adjusting to all the recent changes in our lives, I just needed a new look, something brighter to get me through the coming winter.  New colors were narrowed down to a mustard gold, or a blue tone from the water at the right of the print.  I’m not much of a blue gal, but all the gold samples seemed too harsh and we jokingly referred to them as looking like baby poop 😀 .  And I DID want a big change.

We brought home several samples and are very pleased with the results of our choice.  I don’t think I could have gotten any closer to the purplish blue of the print’s water.  It also works very well with the lamps in the adjoining family room.  Bringing in blues, glass items and adding plants, it was easy to pull the two spaces together.

OLYMPUS DIGITAL CAMERA

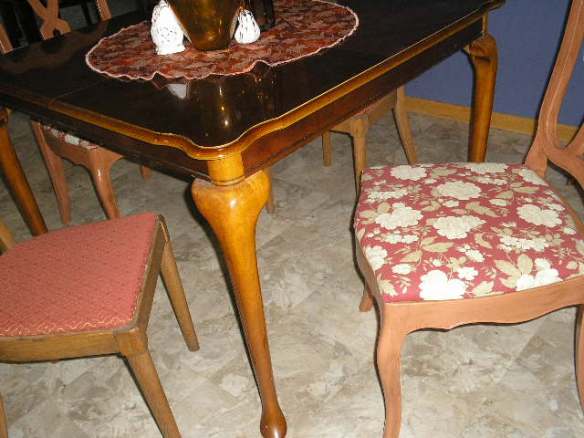
And of course, when you change one thing, there are always others that pop up.  The table cover and the chair seat covers were very (normal) Fall colors, with oranges, beiges and deep burgandy.  At the moment, we’re using mismatched chairs and covers.

OLYMPUS DIGITAL CAMERA

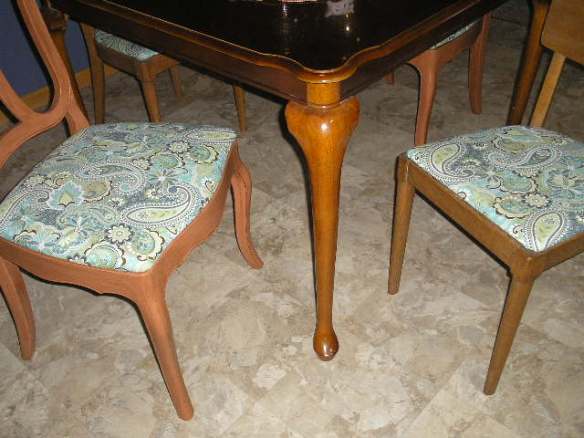
While healing, I’ve also been slowly chipping away at reorganizing my studio/office, and rounded up all my fabric samples.  While it isn’t perfect, I did have a large sample of a modern paisley print in many shades of blues, a light off-white and a touch of two shades of green.  It looks bright and fresh, so I covered my chair seats.

OLYMPUS DIGITAL CAMERA

Oh, nice.  I just noticed a touch of dark brown here and there, so that helps unite the woods in the furniture and the print frame.  This time I used the same fabric on both styles of chairs.

OLYMPUS DIGITAL CAMERA

To finish things, there is just enough fabric left to make a table runner.  Until I get to that, I’m using a square scarf that plays well with everything.

OLYMPUS DIGITAL CAMERA

Regarding the work in the office, well it’s at the “it has to get worse before it gets better” stage!  I DO have all the shelves and cabinets in the closet done.  Now it’s a matter of seeing what I can donate, sell or throw.

I had one wall in the office repainted, before I went into hospital.  There’s one big and one small wall left to fill, sand and paint.  I’m REALLY trying to cut back on furniture pieces and all my craft stuff in there.

Luckily for me, I have two neighbors who are 3rd grade teachers and I think they may like quite a few of my supplies.

A quick health update.  I have two more surgeries coming up, and hopefully both can be done by end of year.  I want to think of it as 2018 – the year of the knife, but hoping that 2019 is the year of a new life!

Finally, before closing, I am noticing that several people are sharing my posts on facebook, 22 the last post.  That is all fine AS LONG AS YOU ARE CREDITING ME FOR MY POSTS AND PHOTOS.  I ask that you please leave a comment on my posts that you share.  That will mention your site as well, and give us BOTH exposure, and me, the credit due me.  Thank you for your understanding.

As I’ve noticeably skipped Halloween topics this year. just go to the search window and put in Halloween, Fall, Autumn and like terms to see my many previous posts.

Thanks for stopping by.  I hope to post again before Thanksgiving, but if not, enjoy your holidays.  Stay safe and stay positive.

– Cheryl _


Fun Finds Easter Wreath Project

Easter Wreath from Fun Finds

ARTZZLE.COM

This week I wanted to do another quick project, and keep it at under $5.00.

Thrift shops are no different than any other stores . . . they always have lots of seasonal items. Two of my favorite locals are DISCOVERY THRIFT and our FAMILY PATHWAYS. These stores have lots of craft supplies, papers and fabrics along with everything else.

ARTZZLE.COM

Here’s some of what I found.

From Discovery Thrift
• Easter grass: $0.50
• Green flocked wreath with finished back: $2.00
From Family Pathways:
• Packaged Easter table kit: $0.50
From my supply cabinet stash
• Some little green wooden garden stakes: FREE from a garage sale
• A sheet of scrapbooking paper: From a book of 100 sheets for $2.00 at a craft sale long ago

Here’s how I put it together.

ARTZZLE.COM

I separated the Big Bunnies piece into two individuals. I used only one for this project so have the 2nd for another time.

ARTZZLE.COM

Then I eyeballed the bunny behind the wreath to see where to place it.

ARTZZLE.COM

Now, I trimmed the piece, leaving a TAB on the bottom and one on top.

ARTZZLE.COM

Next, using an Xacto knife, I carefully made slits on the top/bottom of the wreath, for the tabs.

ARTZZLE.COM

TIP: Note that my wreath form is about 2 ½ inches deep; so I cut mid-way into the form. This gives the rabbit more depth than just gluing it flat to the back of the wreath.

ARTZZLE.COM

As always, I puttied a piece of wax paper on my work surface. Just to keep the mess contained a bit.

ARTZZLE.COM

After the glue gun warmed up, I took four full length stakes and glued them as pictured, to make the cross piece sections for my little fence.

ARTZZLE.COM

Next, I cut down several plant sticks, to make fence pickets. I used the pointed ends for this project, but saved the cut-off pieces for another day.

ARTZZLE.COM

Here’s where we are in the project.

ARTZZLE.COM

Now I took some paper eggs from the kit. Removing the paper from the stem left a tiny hole in the egg. So, little flowers were cut-out of the scrapbook paper, and used to disguise the holes when needed.

ARTZZLE.COM

Next, I glued several paper eggs behind and throughout my little fence. And then, eggs with the flowered coverings were added around the top of the wreath.

ARTZZLE.COM

Last part was to add some texture with the Easter grass.

ARTZZLE.COM

Gathering a clump of grass, I then wired the middle, and after three clumps were made, I then glued them onto the back (or inside) of my fence.

ARTZZLE.COM

I pulled strands through the pickets, then gave everything a jagged haircut . . . and here it is!

ARTZZLE.COM

Of course this is just an example of how I used my “fun finds”. Yours will be completely different . . . and speaking of yours . . . I always like to see what you’ve done. You can connect with me on PINTEREST or HOMETALK or FACEBOOK and share your photos.

TIPS:
1. For More Depth: I made large dobs of hot glue behind some of the eggs and flowers. This makes them stand away from the surface, for more depth and added interest.
2. On The Fence: The eggs were glued behind the fence and in & out some pickets. This way, after grass is added and adjusted . . . the eggs look “hidden” for the hunt.
3. I glued flat, a few partial flowers to the front and ground of the fence. This helps s tie everything together throughout the wreath.
4. You Regulars all know that I like things a little WHONKY . . . no perfect here. That’s why I glued my fence pickets on a little crooked . . . more fun to do . . . more fun to look at too! 🙂

So, it’s time to say “don’t stress too much, just start something!”

Thanks again for all of your well wishes after my “broken ribs” fiasco. Each week is a little bit better!

And naturally, I LOVE COMMENTS so keep em’ coming! Thanks.

OH, I’m linking this post to THE SCOOP linky party.

Find them through Anita at CEDAR HILL FARMHOUSE

This week’s host is Barb at THE EVERYDAY HOME
Lot’s of fun there. Take a look!

Later – Cheryl

Copyright © 2013-2014 Artzzle All Rights Reserved