“EZ Pack” Summer Trip Wardrobe

MIX & MATCH
*******
Let’s drop all the grays today . . . and bring some color out to play!
For a Short, Summer “Trip Away” . . . it’s Mix & Match with these 8 basic clothing pieces. interchangeable, to accommodate varied activities and weather, casual stops and anything a bit more formal, like a dinner gathering.
Daydreaming about the above collection . . . two of my granddaughters were main characters in the scenario.  Each has week-away trips this summer, and so packing, travel and specific included events were considered.  But Fashionistas of any age could easily adapt this look . . . by simply choosing a different skirt and shorts length and style.     Also, some women would want to choose a less flared leg cut in the slacks, for a more flattering look.
Let’s start with these basic pieces. The item list stays the same for everyone, but of course, each of you will consider your individual size, style and color choices.
  • 1 Skirt
  • 1 Pair Shorts
  • 1 Pair Slacks
  • 1 Basic Dress
  • 2 Casual blouses (1 patterned, 1 plain color; short sleeved works too)
  • 1 3/4 Sleeve Top (for variety and rainy/cooler conditions)
  • 1 Jacket (I chose a short-waist, b/w stripe that works as dressy or casual)


Are you asking “Why  Choose Black For Summer”?   I chose black because my daydream was about my granddaughters’ upcoming events, and the “on-the-road” aspects. First of all, the “Black goes with most anything” idea and the “Little Black Dress” rule (which also includes slacks) always travel well.  Black doesn’t show spots  and stains as boldly as lighter colors do.  An easy wipe away will usually do the trick, without laundering, which no one wants to do on a short leisure trip (especially teenagers!).

Perhaps the best reason for black in basic pieces is . . . it’s trait of adapting so well in a mix & match group.  It DOES go with almost anything, and BETTER yet, in classic styles as seen with this dress and slacks choice, these items can be “dressed up” or “kept more casual”, depending on which accessories you use.
Accessories List.
  • 2 – 4 Pairs Shoes.  The 2 for me would be the striped heels and the aqua flats.
  • 2 – 3 Belts
  • 2 – 3 Scarves
  • 1 medium sized purse/bag
  • 2 – 3 each of jewelry pieces, i.e. necklaces, bracelets, earrings, optional broaches


Here comes the color . . . and the Fun!

OUTDITSartzzle.com
*******
Do more with everything.  For example, that cute striped jacket looks great with the black slacks.  And the separate jewelry items can be mixes in a million ways.
The purpose of MIX & MATCh is versatility from few items.  These clothes (and necessary personal pieces) will fit into one decent sized suitcase.  A smaller, carry-case would hold accessories, makeup, hair essential and the like.
So you’re on your way,to that quick, easy and light trip . . . but you have all you need!
TIPS:
  1. Folding and packing clothes FLAT allows more room AND doesn’t wrinkle as badly
  2. Slip shoes into ZIP LOC bags to contain pairs, and not get clothing pieces dirty
  3. CHOOSE easy care fabrics when possible; can be rinsed/hung/dried by next day
  4. ZIP LOCs are also great to contain all those small items AND jewelry if you don’t have a cloth jewelry roll available
  5. Bags are best for all liquid and twist lid items.  No problems accidental leaks.

I would love to get your ideas on outfit combinations . . . and all else from today.  Leave a comment or you can find my email on my profile page.

This post was fun for me . . . hope you like it too!

Remember  . . .  if you stress too much . . . that trip won’t be as much fun!

Later – Cheryl

PS:  APOLOGIES for the erratic spacing in this post.  Working between VISUAL, TEXT and three individual Polyvore articles, seems to have scewed the platforms.

*** This original article “EZ Pack Summer Trip Wardrobe!” appeared first on Artzzle.com. No included content or photography can be used elsewhere without specific permission and accreditation from contributors. Outside sources are marked when available.

Copyright © 2013-2014  Artzzle All Rights Reserved

ARE YOU AFRAID . . . of Grays ?!

Canopy Contest

CRAZY … CRAZY… CRAZY !   That’s our place lately. So I multi-tasked today and combined Polyvore work with this post.  Above, the task was to create a bedroom for myself, decorated personally and including a canopy bed.  Grays have been batting my brain cells around, so I used a gray-blue color range and a few specific, spunky pieces.  Go ahead and link up for all the details.   Canopy Contest by artzzle-com

APOLOGIES FOR . . .  so few posts of late, but honest . . . I really have been working on them. What’s  happening though, is so many great ideas are flying around that, I have trouble finishing any because I need to write down another one before I forget it!

COLORS AND PAINTING . . .  are topics that have been right up front in my thoughts most often. Both because Hubs and I are working on main projects in our own home, and I’ve been researching for an upcoming series of posts.

READERS, YOU PROBABLY AREN’T SURPRISED . . .   when I say that our preferences always lean WARM. Lots of beige, browns, coppers, and like that! Well you may be shocked to hear that we’re (mostly I’m) craving a change.  We just bought new furniture pieces . . . two recliners and a cute little love seat.   Don’t get too excited yet . . . they’re brown. A beautiful soft, chocolate tone. 

NOW, THAT SAID . . .  we are changing accents and a few wall colors.  They’re running to GREEN (warm of course), and I’m bringing back a favorite, AQUA.  Not the bright, neon shades.  I’m muting them, with warm gray tones.  And speaking of gray, I’m pulling in several versions of it, and a couple of wonderful gray-blues.

ARE YOU MAKING A SOUR FACE YET . . .  at all the gray?  The nose turned up . . . the lips scrunched and grimacing?  “Grays . . . seriously?”  Well . . . YES, and let’s do get serious.  All you TREND FOLLOWERS will be on top of things with grays.  They are VERY POPULAR presently in decor.  Not only have color combos with grays as primaries, been favorite decor schemes for decades, they continue to be as useful as the beige family, for neutrals OR accents, as well.

TAKE A QUICK LOOK . . .   at the Polyvore set below.  Some of these ideas are on the mood board Hubs and I are working on.

Great Grays

IN A SERIES OF UPCOMING POSTS . . .  I’ll feature more info, ideas and examples of just why grays are so wonderful to work with.

LEAVE A COMMENT AND TELL ME  . . .  how you feel about GRAYS. Then we’ll see what you think at the end of the series. Who knows 🙂

MEANTIME . . . you know the line. Don’t stress too much, just start something.

Later – Cheryl

*** This original article “ARE YOU AFRAID . . . of Grays!” appeared first on Artzzle.com. No included content or photography can be used elsewhere without specific permission and accreditation. Outside sources are marked when available.

Copyright © 2013-2014 Artzzle All Rights Reserved

IT’S ABOUT TIME . . . I Took My Own Advice!

STRESS954203a09ec298a50ced0b3a8ee28cf1

DON’T STRESS TOO MUCH . . . JUST START SOMETHING!

How many times have you heard me say that !?

There’s been a lot of extra stress lurking around here lately!  Vehicles down, allergies up (WAY up) and a couple short-check weeks, just for a few examples.  Oh, and that nasty neighbor (who of course, lives right next to us) in our otherwise amicable neighborhood!  Doesn’t it seem like every area has one stinker in the bunch.  Ack!

The blog and accompanying social sites have kept me very up and down i.e. great then lousy, and quite literally UP at night!  That isn’t new of course, but continuously stressful.

Well, I’m thinkin’ it’s about time I followed my own advice!  I’m tired of stressing out.  Just tired period.  So I sat myself down, took a bit of “me” time with the little notebook . . .      and started a list.

clipart-pencil-checklist

OK, I hear some of you groaning … “Cheryl, you’re always making lists”!   But hey, most times IT HELPS ME!  I’ll thank you to cut me a little slack this time.

First, I affirmed that these would be concise notes.  When writing anything, I always have to remind myself to edit, edit, edit.

              Beginning, I jotted down three presently good specifics. Thought it would help to start on a positive note.

  1. Summer has finally come (though up here, who knows for how long!)
  2. Excluding the allergies (irritating but normal for the season), we’re in decent health
  3. I have fun company visiting soon, and YES . . . company is good . . . this company anyway because it means . . . SHOPPING!

Courtesy of Dreamstime.com

Okay, those are self-explanatory. Lets get to the crappola.  Next, I listed 3 big stresses.

  1. The Blog
  2. Money issues and/or retirement
  3. A certain personal relationship in our lives

Yes, THE BLOG is still very troublesome.

OLYMPUS DIGITAL CAMERA

Traffic and interest are very inconsistent, which I almost dread saying for fear I may get even more of those “Pitch emails or supposed new followers who say  “I/We can make your blog wonderful . . . for just a few hundred dollars or so”.

I KNOW

I need assistance, but am very picky about where to find it, and also very self-critical that I can’t do everything myself.  It still isn’t quite the look I’m going for.  I’m not particularly thrilled with some of my posts.   And although I’m venturing to more outlet exposure, most of the Social Media Tools are frightening to me!

I AM VERY REALISTIC

in knowing that odds are slim of making any measurable amount of monies from the blog.  But I was hoping for a little mad money or occasionally enough for a minimum household payment or two.

That leads us to the other money issues . . . which are MORE than just a bit scary, especially when full retirement is looming. Once we decide what things we can create and sell when Hubs retires, we should be okay but It will be a penny-pinching ride all the way,

Last, the personal issue.  Don’t worry, Hubs and I are fine; just celebrated 29 years of marriage and nearly 31 years together . . . and NO . . .

bridesgroomsgraphicsfairy010c

. . . this IS NOT our wedding picture!

Source: THE GRAPHICS FAIRY

The stress is another relationship that has changed drastically for us in the past few years and seems headed for a complete breakdown.  Something once loving, caring and sharing, has become discounted with limited contact, little sharing or inclusion and too often, rudeness with no consideration or caring shown us.  We’re told we are at fault, yet NOT told the why or what of the matters.

So there you have it.  I’m STRESSING . . . a lot, and I always tell you NOT TO STRESS.

WHAT DO YOU DO

in stressful situations?  How do you approach the problems?  There aren’t any magic solve-all formulas for any of us.  Just curious to know what helps others.

My list did help.  The physical writing then reading, helped me – shall we say- get a grip on things.

  1. Considering positives first allowed me to calm down, take a few healthy deep breaths, and reach a more reasonable demeanor.  Stress just tends to freak us out doesn’t it?! Who can function like that?
  2. I was reminded to be appreciative of good things in my life, of which there are many.
  3. Reviewing main stress factors assisted me in evaluating and devising helpful alternatives.  We can’t just have a nervous breakdown .. . seriously.

For all of us, it’s a very personal journey.  We are the prime players in our lives, and so must be the primaries in how to handle the problems in those lives.

WOULD YOU AGREE

that there is no such condition as a stress-less life?  That said we do have choices.  Perhaps I should say we can give ourselves choices.

I chose to stay with the blog . . . and what do you know. A few nice “someones” came along with some helpful advice and encouragement.

And instead of brooding, Hubs and I have been scouring Pinterest and our own project notebooks and compiling a nice list (yah, yah . . . another list) of cost effective items that would be sale worthy in our direct area, and others that would have a broader, more urban appeal in the cities.

The more personal area is a toughie.  No one can control someone else’s behaviors, especially if communications aren’t welcomed.  But we can lean on others who do care, and try to toughen up when people get hurtful.  We can let them know we continue to care about them and will be as supportive as possible.

BUT (and that’s a BIG ONE HERE)  if/when people become abusive . . . and YES, verbal and/or emotional abuse count … I’ve learned to not allow it and remove myself from the situation  IMMEDIATELY.  Many wise people have shown me that over time.

Thanks so much for visiting.  Hey, let’s talk more about this stress stuff.  Leave a note.

As always, don’t stress too much . . . just start something!   Geez, did I really just say that!

Later – Cheryl

*** This original article “IT’S ABOUT TIME. . . I Took My Own Advice!” appeared first on Artzzle.com. No included content or photography can be used elsewhere without specific permission and accreditation. Outside sources are marked when available.

Copyright © 2013-2014 Artzzle All Rights Reserved

HIGH vs. LOW

HIGH vs. LOW
************
Readers . . . just click on the products pictures to get pricing information!
Hi All 🙂

Literally, with the world at our fingertips today,
we can instantly become
VERY STYLISH INDIVIDUALS
and simultaneously be
VERY BUDGET-WISE SHOPPERS

There are so many shopping sites out there
where you can find any item you want
and be able to pull up similar items
and even request varied price ranges.

So HIGH vs. LOW Shopping is a snap!

Today, I played with the tools on one of my favorites, Polyvore.
You can also have fun with it through the links pictured above.

Let me know what your favorite Online Shopping Sites are.
It’s would be fun to compare notes!

Thanks for visiting and as always,
don’t stress too much about it, just start that project!

Wishes to all for a safe, fun and happy Memorial Day Weekend.

Later – Cheryl

***
This original article “HIGH vs. LOW” appeared first on Artzzle.com. No included content or photography can be used elsewhere without specific permission and accreditation.

Copyright © 2013-2014 Artzzle All Rights Reserved

The Blues

The Blues
Hi All.
So many of us are welcoming Spring with new looks in a room or two.
We’ve often talked of monochromatic color schemes,
HERE . . . and  HERE.
You’re working with just one main color,
using tints and shades of it.
It makes choosing colors much easier,
and you know that they will work together,
because they are in the same family.
***
Studies show that blue is one of the most popular decor colors.
Trending currently are blues in the aqua hues,
so I’ve put together an inspiration board,
with fun colors, textures and patterns.
I hope these get some ideas flowing.
***
Remember, the three important basics of good design . . .
Color, Texture and Pattern
Combining these compatibly, always creates interesting spaces.
Thanks for stopping by.
Have a great weekend and as always,
don’t stress, just start!
Later – Cheryl

***
This original article “The Blues” appeared first on Artzzle.com. No included content or photography can be used elsewhere without specific permission and accreditation.

Copyright © 2013-2014 Artzzle All Rights Reserved

Do You Remember These?

  Hi All.

DON’T  WORRY  . . .
today’s post IS NOT a rerun!
It’s just a fun new project with items you may remember
from past articles.

Do you remember these?
On one of my “Junk Trips” last summer . . .

ARTZZLE.COM

I found all these wonderful wooden pieces,
and mentioned them HERE 

And most of you . . . even Newer Readers, will probably recognize . . .
the wall artwork in this picture

ARTZZLE.COM

Followers with me from the get-go . . .
may remember the same painting . . .

ARTZZLE.COM

hung in a different direction.
The art piece was done years ago. I needed something BIG and colorful.
And everyone knows how manically changeable I am,
so I wanted options there too.

ARTZZLE.COM

One afternoon, as I woke from a nap,
sleepy eyes caught a wonderful pattern.
reflected from a multi-paned window,
great lines and shapes in light and shadows.
On that day, and at the same time for the next two days,
I worked to capture the design on my drawing pad.

After scaling it up proportionately,
Hubs cut a piece of plywood in that size.
I graphed out my design . . . and began to paint,
using colors from throughout my home.
When the paint was completely dry,
I came in with a narrow brush and some metallic copper paint (by Behr),
and carefully trimmed each section with a thin copper border line.
Hubs added a simple, modern look frame and it was finished.

WELL . . . it met my initial wants and needs,
BIG, BRIGHT and CHANGEABLE.
I could hang it several ways,
and I painted new colors whenever I wanted.

BUT, there was always something not quite right. Know what I mean?
Oldest son and youngest daughter
are always my best “art” sounding boards.
We all agreed that it was lacking . . . it was boring, it was too FLAT.

ARTZZLE.COM

Well . . . FINALLY, the other day . . . I had this idea.
In Hubs’ shop, I rounded up some of my barn sale junk
and raw walnut pieces,
and an odd collection of small, miscellaneous items.
I just played with them, placing them randomly
on the painting until satisfied.
I then used wood glue to adhere the items to the painting’s surface.

ARTZZLE.COM

After waiting for two days, to assure that
even the heaviest pieces were attached,
I had more fun, playing with some fun-tac and small accent items.

ARTZZLE.COM

The pictures show the succession of arrangements.

ARTZZLE.COM

My final look . . . ( or should I say, present look ) is below.

ARTZZLE.COM

I hung a cup from the hooked wooden piece,
and tacked it’s saucer flat to the surface.
I am crazy for wooden branches and included two.
And finally, I printed an excerpt from a Van Gogh painting I favor,
then cut pieces of it to use as inner liners on three of the wooden items.
The larger figurines and dishes used, are of a Japanese theme.
Birds, butterflies and a Victorian styled medallion were also included.

So the painting is no longer boring and flat.
I’m happy . . . for now, at least, ha ha.
It would be fun to know what you think of my collage.

As always, thanks for stopping by.
And don’t stress too much, just start that project.

Later – Cheryl

***
This original article “Do You Remember These” appeared first on Artzzle.com. No included content or photography can be used elsewhere without specific permission and accreditation.

Copyright © 2013-2014 Artzzle All Rights Reserved

Monday Menagerie

Hi All. How was your weekend? Ours was pretty darn GOOD!

But now, here’s . . . . . . . MONDAY!
It’s cold but bright.
Hey, sunny’s good, right!?
While outside is fine
inside’s not sublime.

Our weekend was all “home-time” and no “house-time”. So today, UH OH, the place is a little messy – make that a LOT messy. Fortunately, I’m in a cleaning/organizing mood and ready to attack! Problem is I also wanted to sneak in a short post today. But about what?

This morning my many emails were FULL OF COLOR, no matter the subject.

So I’ll continue that theme and say . . .
Welcome to MENAGERIE MONDAY
With color, color everywhere.
The subject . . . well, we just won’t care.
I’m cleaning Picture files, so sharing from there.

PRETTY PENS
ARTZZLE.COM

BRIGHT SUPPLIES
ARTZZLE.COM

FLOWERS
ARTZZLE.COM

SOME WEEDS
ARTZZLE.COM

AND WINTER SKIES
ARTZZLE.COM

Finally, MY SWEETEST COMPANIONS in a colorful FALL room
ARTZZLE.COM

I hope your past weekend was fun.

Friday was included in mine this time, because it was the first day in three weeks that I went out & about on my own, after the March Mishap. Don’t worry though, I didn’t overdo. I did get some shopping in. Went to two thrift stores. Then a bit of daydreaming at our local SHOPKO and on the way home, I hit Mickey D’s drive-thru. (It’s right across the lot from Shopko . . . SO convenient!) My newest MD foodie craves are their “Chicken-Bacon-Cheddar” sandwich and those tasty strawberry cream pies, accompanied by a small fries, of course.

Saturday and Sunday duplicated lots of resting and reflecting. There were plenty “together” moments . . . but enough time for our separate “me” projects too; Hubs in his workshop and I in my office.

Oh, and we saw all our favorite Sunday night PBS shows! That’s a big deal around here! 

That’s about it for today. Just one more thing to say . . . don’t stress, just start something.

And REMEMBER . . . I love comments, so keep them coming!
PRETTY PLEASE 🙂

Later – Cheryl
P.S. Ok, Ok, so I’ll never make Poet Laureate 😦 (Geez, I hope I spelled laureate right)

***
This original article “Monday Menagerie” appeared first on Artzzle.com. No included content or photography can be used elsewhere without specific permission and accreditation.

Copyright © 2013-2014 Artzzle All Rights Reserved

Fun Finds Easter Wreath Project

Easter Wreath from Fun Finds

ARTZZLE.COM

This week I wanted to do another quick project, and keep it at under $5.00.

Thrift shops are no different than any other stores . . . they always have lots of seasonal items. Two of my favorite locals are DISCOVERY THRIFT and our FAMILY PATHWAYS. These stores have lots of craft supplies, papers and fabrics along with everything else.

ARTZZLE.COM

Here’s some of what I found.

From Discovery Thrift
• Easter grass: $0.50
• Green flocked wreath with finished back: $2.00
From Family Pathways:
• Packaged Easter table kit: $0.50
From my supply cabinet stash
• Some little green wooden garden stakes: FREE from a garage sale
• A sheet of scrapbooking paper: From a book of 100 sheets for $2.00 at a craft sale long ago

Here’s how I put it together.

ARTZZLE.COM

I separated the Big Bunnies piece into two individuals. I used only one for this project so have the 2nd for another time.

ARTZZLE.COM

Then I eyeballed the bunny behind the wreath to see where to place it.

ARTZZLE.COM

Now, I trimmed the piece, leaving a TAB on the bottom and one on top.

ARTZZLE.COM

Next, using an Xacto knife, I carefully made slits on the top/bottom of the wreath, for the tabs.

ARTZZLE.COM

TIP: Note that my wreath form is about 2 ½ inches deep; so I cut mid-way into the form. This gives the rabbit more depth than just gluing it flat to the back of the wreath.

ARTZZLE.COM

As always, I puttied a piece of wax paper on my work surface. Just to keep the mess contained a bit.

ARTZZLE.COM

After the glue gun warmed up, I took four full length stakes and glued them as pictured, to make the cross piece sections for my little fence.

ARTZZLE.COM

Next, I cut down several plant sticks, to make fence pickets. I used the pointed ends for this project, but saved the cut-off pieces for another day.

ARTZZLE.COM

Here’s where we are in the project.

ARTZZLE.COM

Now I took some paper eggs from the kit. Removing the paper from the stem left a tiny hole in the egg. So, little flowers were cut-out of the scrapbook paper, and used to disguise the holes when needed.

ARTZZLE.COM

Next, I glued several paper eggs behind and throughout my little fence. And then, eggs with the flowered coverings were added around the top of the wreath.

ARTZZLE.COM

Last part was to add some texture with the Easter grass.

ARTZZLE.COM

Gathering a clump of grass, I then wired the middle, and after three clumps were made, I then glued them onto the back (or inside) of my fence.

ARTZZLE.COM

I pulled strands through the pickets, then gave everything a jagged haircut . . . and here it is!

ARTZZLE.COM

Of course this is just an example of how I used my “fun finds”. Yours will be completely different . . . and speaking of yours . . . I always like to see what you’ve done. You can connect with me on PINTEREST or HOMETALK or FACEBOOK and share your photos.

TIPS:
1. For More Depth: I made large dobs of hot glue behind some of the eggs and flowers. This makes them stand away from the surface, for more depth and added interest.
2. On The Fence: The eggs were glued behind the fence and in & out some pickets. This way, after grass is added and adjusted . . . the eggs look “hidden” for the hunt.
3. I glued flat, a few partial flowers to the front and ground of the fence. This helps s tie everything together throughout the wreath.
4. You Regulars all know that I like things a little WHONKY . . . no perfect here. That’s why I glued my fence pickets on a little crooked . . . more fun to do . . . more fun to look at too! 🙂

So, it’s time to say “don’t stress too much, just start something!”

Thanks again for all of your well wishes after my “broken ribs” fiasco. Each week is a little bit better!

And naturally, I LOVE COMMENTS so keep em’ coming! Thanks.

OH, I’m linking this post to THE SCOOP linky party.

Find them through Anita at CEDAR HILL FARMHOUSE

This week’s host is Barb at THE EVERYDAY HOME
Lot’s of fun there. Take a look!

Later – Cheryl

Copyright © 2013-2014 Artzzle All Rights Reserved

Rabbits, Robins and Everything Easter

Can you say . . . SPRING

I can’t say it . . . without screaming and jumping up and down with glee!

Ribs are recovering … Snow is melting … Easter is approaching … and Robins are arriving!

ARTZZLE.COM

Today, I’m sharing everything Easter; a decor idea or two, how-to’s on one of my Make-Do projects and some great online finds from fellow bloggers.

So. . . here we go!

Back before the BIG FALL, I purchased an assorted bunch of flowers at WalMart for $7.99. The mixtures are versatile because divided up, they make several smaller bouquets, for more color around the house.

This particular bunch had all sorts of odds and ends in it . . . so I really had fun. (Sorry, I didn’t take a picture of the complete bouquet).

ARTZZLE.COM

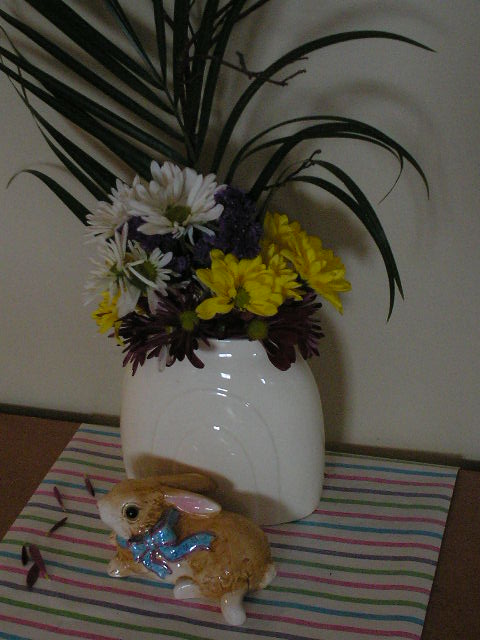
Above, I used the single frond of greenery and added daisies, small mums and purple stasis to a wide mouth vase. A cute bunny figurine and some pretty paper drape, brightened up my credenza.

Below, as flowers faded, the arrangement and vase changed.

ARTZZLE.COM

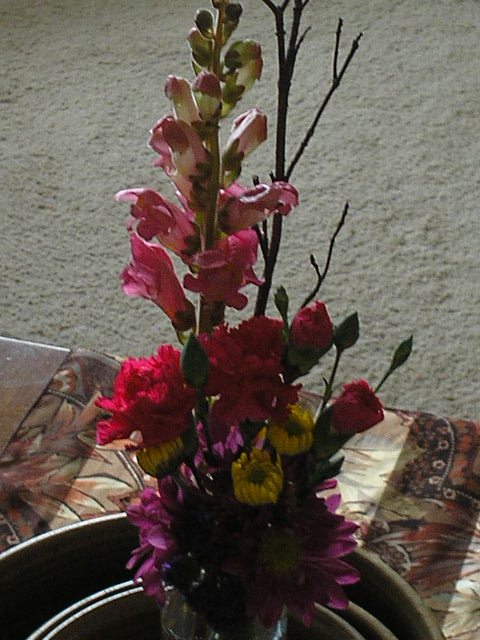
Included in the bunch, was a single lily branch, with several gorgeous blooms and buds. It was substantial enough to stand alone, needing no other flowers.

But on an end table, a pretty little box accents the yellows, greens and browns of the stem.
ARTZZLE.COM

I held the remaining blooms from the bouquet and “arranged them in my hand”, then wrapped floral tape around the stems to secure the group. Then I simply trimmed the ends of the stems and placed them in a little vase for a final arrangement.

TIP: If you don’t have floral tape, a rubber band or light wire will work. Wire tabs from your bread wrappers work well.

ARTZZLE.COM

TIP: The assorted mix bouquets at store stands range from $2.99 to $14.99, making the prices as versatile as the pretty flowers.

Sometimes it’s fun to just get all the same blooms and line them out across a table top, in similar vases.

There’s room for immense imagination here!

MAKE-DO EASTER EGGS

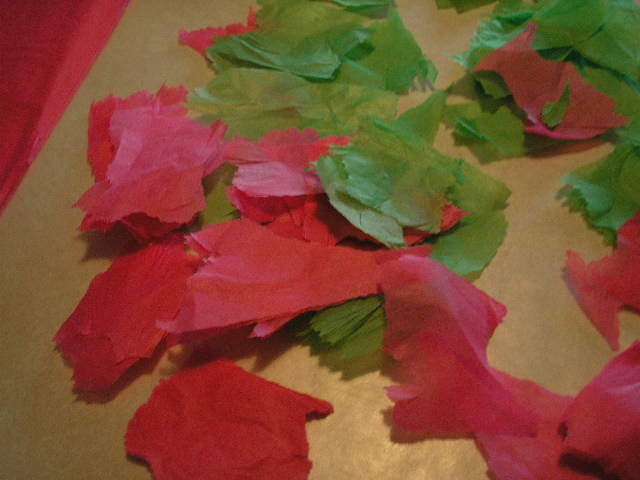
You may remember my “Pretty Gift Box” project, using glue and tissue paper.

That process is used today, on a package of foam eggs, with some colored tissue and ModPodge.

ARTZZLE.COM

I did use a few more tools:

> a “throw away” 2 inch paintbrush
> a glass of water
> wax paper
> some long wooden skewers (like you use to barbaque)
> and two clean rags – one wet, one dry.

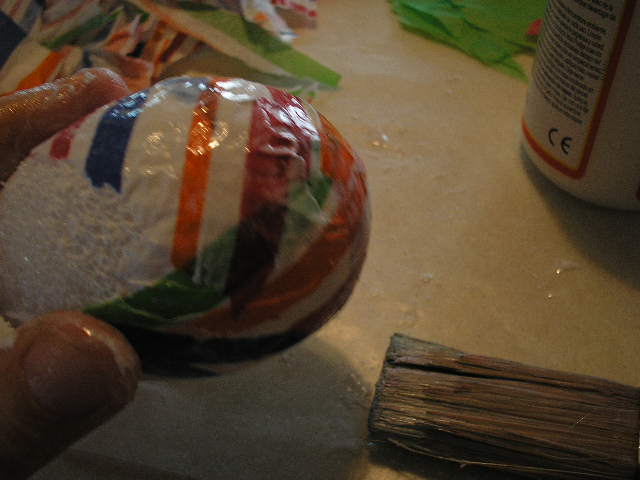
FIRST I tacked down a good sized piece of wax paper to my work table, to help contain the wet, glue as I worked.

The rags were to help keep fingers clean and dry when neccessary. The skewers allow you to hold the egg, making for easier handling as you glue.

NEXT, tear (just rough rips) small pieces of tissue paper. You don’t want straight, scissors cut lines here.

OLYMPUS DIGITAL CAMERA

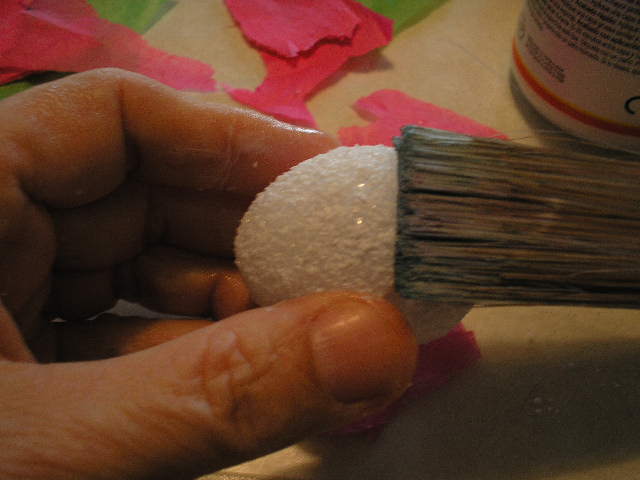
Now, Lightly moisten tip of paintbrush, squeeze out excess water, dip tip of brush in modpodge and begin applying to BOTTOM of egg. ARTZZLE.COM

Put a piece or two of paper over the glue, brush flat onto egg.
OLYMPUS DIGITAL CAMERA

Now push skewer into this area of your egg. The stick gives you something to hang on to and makes the rest much easier to finish. Then just keep going, gluing and smoothing layers of tissue until egg is covered.
ARTZZLE.COM

TIP: Don’t insert the skewer into the bare foam egg before you begin. Always put a layer of paper on the bottom of the egg first, then insert the skewer over that. This way the paper won’t stick to the skewer, so you can easily remove it after drying.

While your eggs are drying, put them in a tall glass to avoid them sticking to each other.
OLYMPUS DIGITAL CAMERA

When the eggs are completely dry, carefully pull them off the skewer and use for your project.

ARTZZLE.COM

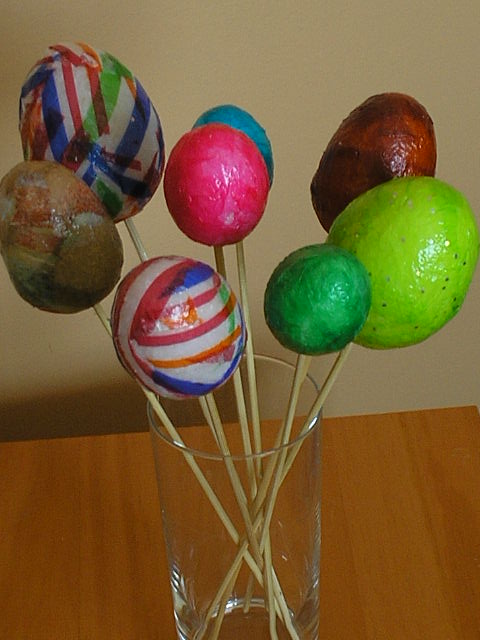
TIP: If you want to use eggs on a wreath, cut the skewer off about an inch from the bottom of the egg, and you will have something to insert into a foam or branch wreath.

Lately, online, there have been tons of pretty projects for Easter.

Easter-subway-art-free-printable1

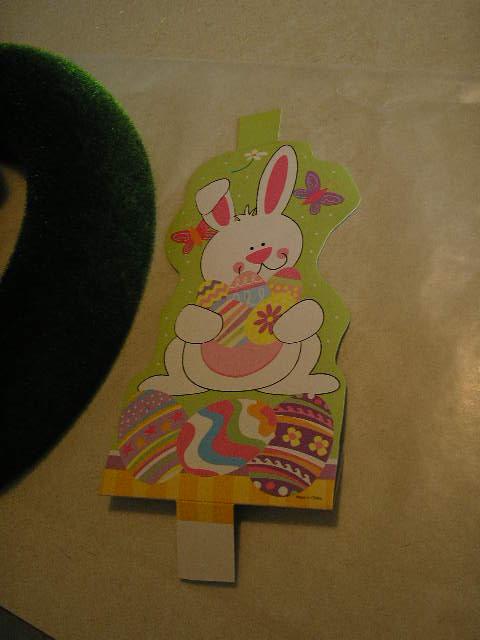
These FREE PRINTABLES from HOW TO NEST FOR LESS are just two. But they’re so colorful AND so appropriate that I just had to share them with you. Thanks Erin.

jesus-is-the-reason-for-the-season-easter1

Before I close the post today, I want to express Sincere Thanks to those of you that noted concern and sent well wishes, after my little accident in March. It’s helping me heal faster, knowing that so many others are thinking of me. Much appreciated.

So, it’s time to say “don’t stress too much, just start something!”

And naturally, I LOVE COMMENTS so keep em’ coming! Thanks.

Later – Cheryl

This original article “Rabbits, Robins and Everything Easter” appeared first on Artzzle.com. No included content or photography can be used elsewhere without specific permission and accreditation.

Copyright © 2013-2014 Artzzle All Rights Reserved

Daydreaming of Spring Greens

Hi All.

Like a broken record, the winter weather goes on and on. And with two broken ribs, the discomfort continues on as well. So, I’m repeating a very early blog I posted from around this same time of that year. So many followers and readers have joined me since, so it will be new to most.

On the mend.
Later – Cheryl

Cheryl @ Artzzle's avatarARTZZLE

The calendar says it is Spring but the weather keeps denying it. Recently, I’ve been daydreaming of all the beautiful greens of Spring. I thought how that color family is also a popular interior choice as well. Beginning decorators are especially drawn to warm greens, perhaps because we see those everyday in nature.

Greens are comfortable for guys and gals alike. They are great companions for woods, stone, ceramic and natural accessories. It’s also very easy to find coordinating fabrics that will also give you additional accent colors to use with your greens.

The featured group of three Benjamin Moore paint strips shows cool, mid-tone and warm greens. Cool green has more blue in color mixture. Mid-tones (brighter) are a more even mix of blue and yellow, and the warms have more yellow in the mixture. The lone strip is a Better Homes and Gardens sample and though not showing…

View original post 399 more words