Fun Finds Easter Wreath Project

Easter Wreath from Fun Finds

ARTZZLE.COM

This week I wanted to do another quick project, and keep it at under $5.00.

Thrift shops are no different than any other stores . . . they always have lots of seasonal items. Two of my favorite locals are DISCOVERY THRIFT and our FAMILY PATHWAYS. These stores have lots of craft supplies, papers and fabrics along with everything else.

ARTZZLE.COM

Here’s some of what I found.

From Discovery Thrift
• Easter grass: $0.50
• Green flocked wreath with finished back: $2.00
From Family Pathways:
• Packaged Easter table kit: $0.50
From my supply cabinet stash
• Some little green wooden garden stakes: FREE from a garage sale
• A sheet of scrapbooking paper: From a book of 100 sheets for $2.00 at a craft sale long ago

Here’s how I put it together.

ARTZZLE.COM

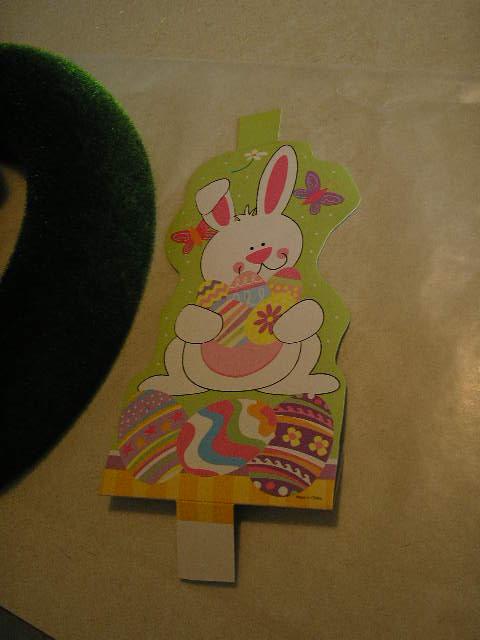
I separated the Big Bunnies piece into two individuals. I used only one for this project so have the 2nd for another time.

ARTZZLE.COM

Then I eyeballed the bunny behind the wreath to see where to place it.

ARTZZLE.COM

Now, I trimmed the piece, leaving a TAB on the bottom and one on top.

ARTZZLE.COM

Next, using an Xacto knife, I carefully made slits on the top/bottom of the wreath, for the tabs.

ARTZZLE.COM

TIP: Note that my wreath form is about 2 ½ inches deep; so I cut mid-way into the form. This gives the rabbit more depth than just gluing it flat to the back of the wreath.

ARTZZLE.COM

As always, I puttied a piece of wax paper on my work surface. Just to keep the mess contained a bit.

ARTZZLE.COM

After the glue gun warmed up, I took four full length stakes and glued them as pictured, to make the cross piece sections for my little fence.

ARTZZLE.COM

Next, I cut down several plant sticks, to make fence pickets. I used the pointed ends for this project, but saved the cut-off pieces for another day.

ARTZZLE.COM

Here’s where we are in the project.

ARTZZLE.COM

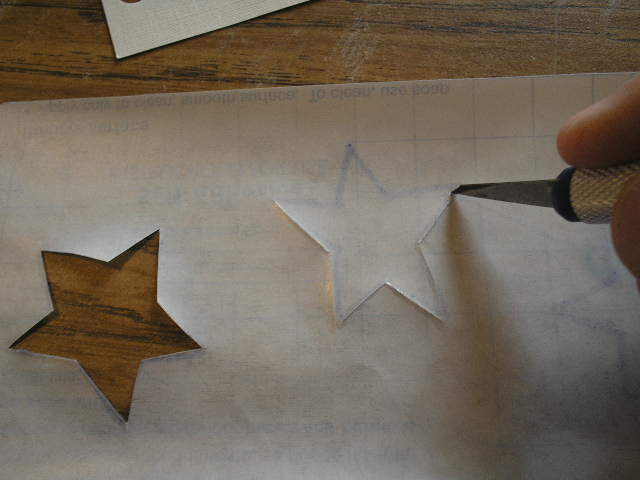
Now I took some paper eggs from the kit. Removing the paper from the stem left a tiny hole in the egg. So, little flowers were cut-out of the scrapbook paper, and used to disguise the holes when needed.

ARTZZLE.COM

Next, I glued several paper eggs behind and throughout my little fence. And then, eggs with the flowered coverings were added around the top of the wreath.

ARTZZLE.COM

Last part was to add some texture with the Easter grass.

ARTZZLE.COM

Gathering a clump of grass, I then wired the middle, and after three clumps were made, I then glued them onto the back (or inside) of my fence.

ARTZZLE.COM

I pulled strands through the pickets, then gave everything a jagged haircut . . . and here it is!

ARTZZLE.COM

Of course this is just an example of how I used my “fun finds”. Yours will be completely different . . . and speaking of yours . . . I always like to see what you’ve done. You can connect with me on PINTEREST or HOMETALK or FACEBOOK and share your photos.

TIPS:
1. For More Depth: I made large dobs of hot glue behind some of the eggs and flowers. This makes them stand away from the surface, for more depth and added interest.
2. On The Fence: The eggs were glued behind the fence and in & out some pickets. This way, after grass is added and adjusted . . . the eggs look “hidden” for the hunt.
3. I glued flat, a few partial flowers to the front and ground of the fence. This helps s tie everything together throughout the wreath.
4. You Regulars all know that I like things a little WHONKY . . . no perfect here. That’s why I glued my fence pickets on a little crooked . . . more fun to do . . . more fun to look at too! 🙂

So, it’s time to say “don’t stress too much, just start something!”

Thanks again for all of your well wishes after my “broken ribs” fiasco. Each week is a little bit better!

And naturally, I LOVE COMMENTS so keep em’ coming! Thanks.

OH, I’m linking this post to THE SCOOP linky party.

Find them through Anita at CEDAR HILL FARMHOUSE

This week’s host is Barb at THE EVERYDAY HOME
Lot’s of fun there. Take a look!

Later – Cheryl

Copyright © 2013-2014 Artzzle All Rights Reserved

Rabbits, Robins and Everything Easter

Can you say . . . SPRING

I can’t say it . . . without screaming and jumping up and down with glee!

Ribs are recovering … Snow is melting … Easter is approaching … and Robins are arriving!

ARTZZLE.COM

Today, I’m sharing everything Easter; a decor idea or two, how-to’s on one of my Make-Do projects and some great online finds from fellow bloggers.

So. . . here we go!

Back before the BIG FALL, I purchased an assorted bunch of flowers at WalMart for $7.99. The mixtures are versatile because divided up, they make several smaller bouquets, for more color around the house.

This particular bunch had all sorts of odds and ends in it . . . so I really had fun. (Sorry, I didn’t take a picture of the complete bouquet).

ARTZZLE.COM

Above, I used the single frond of greenery and added daisies, small mums and purple stasis to a wide mouth vase. A cute bunny figurine and some pretty paper drape, brightened up my credenza.

Below, as flowers faded, the arrangement and vase changed.

ARTZZLE.COM

Included in the bunch, was a single lily branch, with several gorgeous blooms and buds. It was substantial enough to stand alone, needing no other flowers.

But on an end table, a pretty little box accents the yellows, greens and browns of the stem.
ARTZZLE.COM

I held the remaining blooms from the bouquet and “arranged them in my hand”, then wrapped floral tape around the stems to secure the group. Then I simply trimmed the ends of the stems and placed them in a little vase for a final arrangement.

TIP: If you don’t have floral tape, a rubber band or light wire will work. Wire tabs from your bread wrappers work well.

ARTZZLE.COM

TIP: The assorted mix bouquets at store stands range from $2.99 to $14.99, making the prices as versatile as the pretty flowers.

Sometimes it’s fun to just get all the same blooms and line them out across a table top, in similar vases.

There’s room for immense imagination here!

MAKE-DO EASTER EGGS

You may remember my “Pretty Gift Box” project, using glue and tissue paper.

That process is used today, on a package of foam eggs, with some colored tissue and ModPodge.

ARTZZLE.COM

I did use a few more tools:

> a “throw away” 2 inch paintbrush
> a glass of water
> wax paper
> some long wooden skewers (like you use to barbaque)
> and two clean rags – one wet, one dry.

FIRST I tacked down a good sized piece of wax paper to my work table, to help contain the wet, glue as I worked.

The rags were to help keep fingers clean and dry when neccessary. The skewers allow you to hold the egg, making for easier handling as you glue.

NEXT, tear (just rough rips) small pieces of tissue paper. You don’t want straight, scissors cut lines here.

OLYMPUS DIGITAL CAMERA

Now, Lightly moisten tip of paintbrush, squeeze out excess water, dip tip of brush in modpodge and begin applying to BOTTOM of egg. ARTZZLE.COM

Put a piece or two of paper over the glue, brush flat onto egg.
OLYMPUS DIGITAL CAMERA

Now push skewer into this area of your egg. The stick gives you something to hang on to and makes the rest much easier to finish. Then just keep going, gluing and smoothing layers of tissue until egg is covered.
ARTZZLE.COM

TIP: Don’t insert the skewer into the bare foam egg before you begin. Always put a layer of paper on the bottom of the egg first, then insert the skewer over that. This way the paper won’t stick to the skewer, so you can easily remove it after drying.

While your eggs are drying, put them in a tall glass to avoid them sticking to each other.
OLYMPUS DIGITAL CAMERA

When the eggs are completely dry, carefully pull them off the skewer and use for your project.

ARTZZLE.COM

TIP: If you want to use eggs on a wreath, cut the skewer off about an inch from the bottom of the egg, and you will have something to insert into a foam or branch wreath.

Lately, online, there have been tons of pretty projects for Easter.

Easter-subway-art-free-printable1

These FREE PRINTABLES from HOW TO NEST FOR LESS are just two. But they’re so colorful AND so appropriate that I just had to share them with you. Thanks Erin.

jesus-is-the-reason-for-the-season-easter1

Before I close the post today, I want to express Sincere Thanks to those of you that noted concern and sent well wishes, after my little accident in March. It’s helping me heal faster, knowing that so many others are thinking of me. Much appreciated.

So, it’s time to say “don’t stress too much, just start something!”

And naturally, I LOVE COMMENTS so keep em’ coming! Thanks.

Later – Cheryl

This original article “Rabbits, Robins and Everything Easter” appeared first on Artzzle.com. No included content or photography can be used elsewhere without specific permission and accreditation.

Copyright © 2013-2014 Artzzle All Rights Reserved

VALENTINE Projects

Artzzle.com

Hi All. Here’s another super easy project using things you’ll already have around the house.  NOTE: YOU DON’T NEED A LOT OF FANCY TOOLS.

SUPPLIES (Not pictured is a small tension-rod for your window. If you don’t have one, they are found in curtain departments and are very inexpensive.)

Artzzle.com

PAINT SAMPLE CARDS and TISSUE BOXES are two of my favorite recycled/reuse craft items. They have beautiful colors and designs and are a great weight for cut-outs.

Artzzle.com

This project I also used more wrapping paper cutouts and punches, and a big red felt placemat among my post-season stash. It had a whopping $0.24 price tag. Though I did use a few punches here, I also did many things the old fashioned way . . . folding and cutting out larger heart shapes to use.

Artzzle.com

 The wonderful set of punches featured in some of these projects – are not mine. They were on loan from my daughter. I mention this so people won’t be discouraged. Most of my work is done with ordinary, everyday items like scissors, exacto knife and salvaged papers. Same goes for glue. You don’t have to have a hot glue gun or a glue wheel for everything. Less expensive double-sided tapes, tacky glue or elmer’s are available everywhere, and get the job done just fine.

Artzzle.com

SIMPLE STEPS:

Cut five pieces of string. I used twine here. A number of things work; yarn, curling ribbon or fish line. You it light weight enough to have a bit of movement as it hangs down. I cut my longest piece at 25”. Two more pieces were cut at 20” and finally, two pieces at 17”.

TIP: You’ll want to measure your window and see how long you want your pieces. REMEMBER that longer is better, so you have enough to tie to your rod, and more is always good because too much is better than not enough.

Artzzle.com

Here I laid out my string. Tops are held down with fun-tac putty and I’ve added my jingle bells at the bottom to help straighten out the twine. Trying a few dry design placements with my cutouts, when satisfied, I began to glue items to the twine.

Artzzle.com

NOTE: The paper shapes are all doubled. You NEED TWO IDENTICAL PIECES for each display on your string. When applying, you will lay one cutout FACE DOWN, then place your string over it, and glue the matching cutout over the top. As well as helping the pieces adhere to the string, this gives you a pretty view from either side.

Valentine’s Day is winter of course, so your window will be closed. But you’ll still get movement and in my example, I’ll have lots of movement since this window is above a heat register. In summer, you’ll get breeze from the open window.

Now all I have to do is tie my strings to the curtain rod.

Artzzle.com

In my Christmas Window Project SEEN HERE I used coordinating wrapping paper to make a sleeve for the rod. For today’s project, I simply tacked some matching ribbon to the front of the rod so I could hang it higher in the window.

Artzzle.com

See you soon for more fun.
As always, try not to stress about it, just start your project.

Later – Cheryl

This original article “VALENTINE Projects” appeared first on Artzzle.com. No included content or photography can be used elsewhere without specific permission from said originators.

Copyright © 2013-2014 Artzzle All Rights Reserved

Valentines Cards . . . EZ-PZ Make-do Project

Don't forget to decorate and make matching envelopes

Don’t forget to decorate and make matching envelopes

Hi All.

Today begins my mini-marathon of fun projects for Valentine’s celecbrations.

Starting off with some very simple, make-do cards. Remember, my make-do projects are done with no extra shopping, just using what I have available in my stash at home. These turned out nicely.

Here’s my SUPPLY LIST:
1. Heavy card stock or construction paper for the actual card (8 1/2 x 11″ sheets)
2. Pretty papers to decorate the card – here I used wrapping paper and paint sample cards.
3. Decorative scissors and/or punches. I used both.
4. Glue – I used both Tacky Glue and my Glue Wheel. The wheel is cleaner.
5. Invitation size envelopes – I have these on hand, but you can purchase anywhere. Invitation size is 4 1/4″ x 5 1/2″.

MAKING CARDS: Wrapping paper scraps, paint color and color range cards

MAKING CARDS: Wrapping paper scraps, paint color and color range cards

TIP: During my post-season shopping this year, I got some great deals on beautiful wrapping paper, in generic colors that can be used all year round. These cost $1.00 each a roll, opposed to the $4 – $5 seasonal price. So I got all five rolls for the price of one originally!

Paint sample cards available FREE at any paint department or store

Paint sample cards available FREE at any paint department or store

Any store with a paint department has various paint sample cards and sheets and they’re FREE.

Paint color range cards.  Use the colors seperately or cut shapes across two colors for a fun look

Paint color range cards. Use the colors seperately or cut shapes across two colors for a fun look

Decorative Punches.  You can also just cut out your own shapes.

Decorative Punches. You can also just cut out your own shapes.

INSTRUCTIONS are so easy.

Take your sheet of card stock and cut it in half, so you have two pieces 5 1/2″ x 4 1/4″ diameters.

A half sheet heavy paper (half of an 8 1/2 x 11" sheet) An invitation sized envelope (4 1/4 x 5 1/2")

A half sheet heavy paper (half of an 8 1/2 x 11″ sheet)
An invitation sized envelope (4 1/4 x 5 1/2″)

Now BEFORE YOU MAKE YOUR PERMANENT FOLD, loosely hold the edges together and trim with a decorative scissors, cutting both at the same time. Or just fashion a design with regular scissors.

1/2 sheet with top/bottom edges trimmed.

1/2 sheet with top/bottom edges trimmed.

Once trimmed, make your permanent FOLD. Here, I wanted a tongue fold but you can just do a normal 1/2 fold if you want. I like the tongue fold because the inside hangs out below in the front and you get to see pretty decorations on the inside as well as just the front.

OLYMPUS DIGITAL CAMERA

I sat for a time and just punched out various sizes and shapes of designs. Then I played with shapes and laid out various designs.

Layout your design

Layout your design

Then just glue things on. I prefer a glue wheel, because it doesn’t get any overlap glue on the front of your card and decorations. But tacky glue works too, you just have to be more careful.

Glue onto card with tacky glue OR a dry-glue wheel.

Glue onto card with tacky glue OR a dry-glue wheel.

Artzzle.com

For your message, you can handwrite a message. I often use metallic colored markers for this. Or as in the picture below, I just type a little verse in a fun font, cut it out and pasted it in. I thought this card’s front looked like eyes in glasses frames and I had used stars so I said “Your Love has me Seeing Stars”.

Inside, you can type up a little verser or write a message with a pretty marker (metallic colors are nice)

Inside, you can type up a little verse or write a message with a pretty marker (metallic colors are nice)

That’s it for today, but watch for another project soon.

As always, don’t stress, just start that project.

Later -Cheryl

This original article “Valentines Cards…an EZ-PZ Make-do Project” appeared first on Artzzle.com. No included content or photography can be used elsewhere without specific permission from said originators.

Copyright © 2013-2014 Artzzle All Rights Reserved

AFTER’s . . . Results on Cabinet Project

Hi All.

Before I begin posting for my Marathon Valentine Week . . .

HERE’S WHAT YOU’VE BEEN WAITING FOR … the remarkable results from our RUSTOLEUM Cabinet Transformation Kit. This is our bathroom cab’s and woodwork redo. See the HOW TO post on this project.

FIRST a BEFORE reminder!

B4 Bathroom Corner Cabinets

B4 Bathroom Corner Cabinets

Now, below is the AFTER. You notice that the plain, routed design is now covered in a nice trim detail, which was also added to the flat surface door.

AFTER of bathroom corner

AFTER of bathroom corner

Going around the room here.

Going around the room from that corner.

Going around the room from that corner.

The vanity really came out nicely

The finished vanity cabinets

The finished vanity cabinets

We’re re-doing this room in stages. NEXT, we’re going to tackle the countertops, and finally, the lighting and mirror. Not sure yet what will be done with those, but I’ll keep you posted!

Have a nice Sunday afternoon. See you soon with all those Valentine ideas.

As always, try not to stress too much, just start something.

Later – Cheryl

This original article “AFTER’s Results on Cabinet Project” appeared first on Artzzle.com. No included content or photography can be used elsewhere without specific permission from said originators.

Copyright © 2013 Artzzle All Rights Reserved

EASY DIY Cabinet Resurface Project

Hi All.

Regular readers know that Hubs and I love our home. The location is desirable, the price was affordable, and it was newly built eleven years ago, when we moved in. There’s nothing drastically wrong with the house, it’s just very “builder-basic”. Being seasoned homeowners, we were aware that things would need to be replaced or updated around the decade point, i.e. NOW.

For example, the windows. They are vinyl, which is GOOD, but they’re sliders and will need to be replaced eventually. Some of the seals are going bad. That can be done gradually, so not a problem. New flooring was also on our “Reality List”, as was changing out the style and color of woodwork, but again, those could wait or be done room-by-room, a bit at a time. No big financial hit all at once.

House about three months after purchase

House about three months after purchase

Above is a picture of our little house early in the first year. At this point we had put in the asphalt driveway pad and rocked the rest of the driveway area to our entrance road. Also added a bit of shrubery, painted the wooden pillars white and the white shutters and front door were painted gold. Hubs also removed some strange metal pickets between the porch pillars.

So see, though realistic, we love our home . . . . . . . . . EXCEPT . . . . . .

The cabinets are that orange oak finish, with no nice trim. The only detail on the flat surface doors and drawer fronts is a routed line around the border of each. Kind of reminds me of my first “home away from home”, a 1960’s trailer house … and those aren’t all wonderful memories.

Cabinets and door B4

Cabinets and door B4

Original routed design

Original routed design

As experienced homeowners, that seasoning includes several cabinet “resurfacing” projects, the majority for which we hired professionals. You may be wondering about that, asking why we didn’t do all of them ourselves.

Hey, that’s EASY to answer . . . WE WANTED TO STAY MARRIED !

Now I’m continually bragging about Hubs … and it’s true, he can build just about anything I can draw. He’s very talented and patient. I, on the other hand – not so much (a few talents, yes, but patience – that’s a BIG NO). However, refinishing projects are not mastered areas for either of us.

Then there’s the big mess. Smelly, drippy chemicals and all those rags! Stripping, sanding and … more sanding. ICK. If you do finally get the thing cleaned up and painted, most times you either don’t like the finish or it doesn’t hold up and wear well over time.

The MAJOR PROBLEM was we just never found the right products or materials to help us. Many of you know my pain here. C’mon, admit it … you’ll feel better. At least, we’re not alone, right!

Today, I truly and confidently say to one and all – PROBLEM SOLVED. We found the right products!

1. EASY . . . it’s a kit.
2. SUPPLIES INCLUDED . . . has all you need but protective gloves & rags
3. NO SANDING, NO TOXIC CHEMICALS
4. WEARS WELL . . . we did our bathroom almost three months ago and it is fine. Not only with daily wear and use, but we often put our dogs in there when we’re gone, which means additional wear and tear.
5. Lots of colors, combinations and techniques you can choose from.

OK, so THE WINNER IS . . . . RUSTOLEUM CABINET TRANSFORMATION KITS.

The KIT

The KIT

All you need to purchase besides the kit, are work gloves and rags. NOTE: We wanted to add to the door’s design so bought trim pieces for that, on our project.

You'll need to purchase protective gloves and a bag of lint free white rags.

You’ll need to purchase protective gloves and a bag of lint free white rags.

I have always trusted, used and recommended Rustoleum paint products. I just wasn’t aware of this one. We were at our local hardware store, Marv’s True Value in Princeton, Minnesota. Their paint experts, Sue, and her assistant, Brandon, told us all about the kits. That’s plural because also available, is a Countertop Transformation Kit. There is a video for each that you can watch at the store, but it is also included in your kit, for referral at home during the project. (Didn’t I say EVERYTHING was included)

The cabinet results have been so wonderful, that we’re considering doing the countertops next. Here again, we’ve never had luck previously with a countertop DIY project so, I’m still a bit of a doubting Thomas. If any of you have used the countertop kit, I’m sure the rest of us would love to hear and see your results.

Time-wise our bathroom project was completed over a three-day weekend. Part of that time-frame included Hubs cutting and adding the new trim pieces.

Following are the step-by-steps for our bathroom cabinets re-do.

Remove doors from hinges

Remove doors from hinges

Hinge stays in place.  Only door is removed.

Hinge stays in place. Only door is removed.

1st Door removed

1st Door removed

We researched and found an appropriate size trim that Hubs used to cover the routed borders.

New trim pieces cut and being added

New trim pieces cut and being added

Here’s the first fully trimmed door.

Door with new trim added

Door with new trim added

NOTE: Normally, using the KIT, you don’t have to sand anything. You go right to the step below … putting on gloves and then applying the degreaser to the pad (both provided) and scrub the surface. The instructions are very clear and understandable.

No need to sand UNLESS you have bulky residue on surface.  We had excess filler from added trim corners, so we DID lightly sand those areas.

No need to sand UNLESS you have bulky residue on surface. We had excess filler from added trim corners, so we DID lightly sand those areas.

After thoroughly cleaned, wipe down well with rags.

OLYMPUS DIGITAL CAMERA

REMEMBER: You’ll also have to degrease and clean your cabinet frames in the room. We also did all of the woodwork in the bathroom, and the bathroom side of the entrance door. You’ll see that Hubs added a decorative strip to that flat door as well.

After all is degreased and cleaned, you apply the first coat of color. Let that dry completely, and then do a 2nd coat.
OLYMPUS DIGITAL CAMERA

After both coats of color are on and very dry, you have a choice. You can apply the sealer (per directions), or if you like the look, apply the stain technique and then the final sealer coat. We didn’t choose to use the stain because we preferred the painted look. The wood grain is still seen and we just liked it this way. IF YOU DO use the stain, that will have to dry before you can seal the finished product.

NOW … I MUST APOLOGIZE. I have to be a bit anti-climactic. I can’t show you the finished result photos today. Seriously, NO JOKE. My computer’s USB port is not playing nice with my camera’s plug (Hhmm that sounds strange). Anyway, I can’t load the final pictures.

I have a HELP call in to our computer GURU and hopefully it won’t take long to fix the troubles.

So for this time, as always, don’t stress (you won’t have to with the kit) and just start your project.

Later – Cheryl

This original article “EASY DIY Cabinet Resurface Project” appeared first on Artzzle.com. No included content or photography can be used elsewhere without specific permission from said originators.

Copyright © 2013 Artzzle All Rights Reserved

Last Minute Holiday Projects … in 15 minutes or less

Hi All.

ONE WEEK FROM TODAY IS … THE DAY. Anybody needing some last minute, quick little Holiday accents?  C’mon, it’s OK to admit it.  Everyone has had that dilemma at one time or another  … you have most (or almost) everything you need … BUT it just hasn’t all come together yet.

MAKE IT EASY ON YOURSELF.  Let me help with some easy AND economical projects, most of which can be done in 15 minutes or less. Just don’t wait until 15 minutes before your guests arrive, to do them … the night before would be better!

ALL YOU NEED IS …  a roll or two of holiday wrapping paper, some ribbon, twine or pretty string, a few unbreakable ornaments and one or two minor items that you’ll probably have around the already.  If not, a quick run to the closest Big Box Store will do the trick.   So …

HERE WE GO.

Artzzle Christmas

Dress up a smaller window … YES, EVEN IN A BATHROOM!

Artzzle Christmas

Above is everything you need.
1. TENSION ROD
This is an adjustable little curtain rod. You set it’s length to just a bit wider than your window opening. A spring inside allows you to then push it into place in the window, and the tension holds it there.
2. ORNAMENTS
Using unbreakable ornaments is best. Use an odd number so you have a center piece for balance.
3. RIBBON, TWINE or STRING
I used narrow, paper ribbon in a copper color, to coordinate with the rest of the project and room.
4. ROLL OF WRAPPING PAPER
You won’t need the entire roll, but you have to use rolled paper as opposed to folded, flat sheets.

FIRST, adjust the rod to fit your chosen window. Then decide how far down from the top of the window, that you want your paper to show.
NEXT, cut your paper: Make the length the same as the length of your rod. Make the width double the amount you want showing.
NOW, fold over each end on the long sides, about two inches or so, folding the excess to the back side of your paper.
NEXT, lay out your ornaments on your work table. The center one is your main ornament, and should hang from your rod, either shorter than, or longer than your side ornaments. EXAMPLE: My center piece is longer, and in a different design than the others. Then, balance one on each side of your center one, then two more and so on. Once I had my arrangement, I then cut pieces of ribbon, accordingly, to how far they would hang down from the rod.
NEXT, tie one end of ribbon to the ornaments and the other to your rod, and hang rod in window.
FINALLY, just fold your wrapping paper over the rod until you have the right amount showing in front. Gently pinch a fold in the paper at the top of the rod, to better keep it in place.
Artzzle Christmas

#2 PAPER/RIBBON PROJECT
This one doesn’t even take 15 minutes, it’s SO EASY and QUICK.

Below is the credenza featured in the previous post. See how much more festive it looks with this easy addition.
Artzzle Christmas

All you need is
1. WRAPPING PAPER
2. RIBBON
3. DOUBLE SIDED TAPE or GLUE
Use tape OR glue with paper and cloth ribbon.
Use glue only with metallic and/or wired ribbon (the tape doesn’t adhere to the metallic ribbon)

Just, measure the length and width of paper you want for your table. Fold an inch or so on the long edges, to the back or underside of your paper. Then, adhere ribbon to the hanging edges and done!

OLYMPUS DIGITAL CAMERA

TWO MORE !

EASY TABLESCAPE CENTERPIECES

I’m always advising to use what you already have. It also works at Christmas.

Here’s the green one featured in our last post. Just a big glass bowl, a plant, some ornaments and wrapping paper ( also a fabric remnant ). It’s so easy you don’t need instructions.

Artzzle.  Christmas

REMEMBER Christmas doesn’t always have to be red and green. I have lots of browns, coppers and other metallics in my home. So I put this together.

OLYMPUS DIGITAL CAMERA

I began with a beautiful copper and gold wrapping paper (same as on the window treatment)
OLYMPUS DIGITAL CAMERA

Then I added the runner from a Thanksgiving project.

Artzzle Christmas

In this last shot I tried a big, old rusty star with it. Haven’t decided if it stays or goes. Except for the ornaments in the vase, these are everyday items … just combined differently and dressed up for the holidays … that extra SPARKLE.

OLYMPUS DIGITAL CAMERA

Now, as they say … ONE MORE FOR THE ROAD

If you’ve got BOOKS and WRAPPING PAPER … you’re set to go. And you can set the timer for 15 minutes!
OLYMPUS DIGITAL CAMERA

I have several very pretty holiday books that I display as is. But to add color here and there, I cover others. This is a Christmas book, but Martha on Blue doesn’t fit my scheme this year.
OLYMPUS DIGITAL CAMERA

First you need to correctly size your wrapping paper. Follow the instructions below.
scan023

Artzzle Projects

Open your book and slide the tube (pretty side up) onto the cover.

OLYMPUS DIGITAL CAMERA

Wrap around the front, spine and to the back edge.

OLYMPUS DIGITAL CAMERA

Now you’re almost done. Slip the open tube onto the back cover.
OLYMPUS DIGITAL CAMERA

OLYMPUS DIGITAL CAMERA

Now you’re finished.
OLYMPUS DIGITAL CAMERA

Don’t waste precious time trying to wrap every single book. Just do a few, in a few sizes and different papers. Then use them wherever you need color and Christmas!

OLYMPUS DIGITAL CAMERA

Whew, a long post! It will probably be easier to print out at least the book cover section. There will be one more before Christmas … but don’t worry … just a short one!

Dearest Readers, as the holidays draw near, I wish for all happiness, joy and peace in this special season, no matter your beliefs or celebration reasons. Stay safe and warm.

As always, try not to stress, but just start.

Later – Cheryl

This original article “Last Minute Holiday Projects … in 15 Minutes or Less” appeared first on Artzzle.com. No included content or photography can be used elsewhere without specific permission from said originators.

Copyright © 2013 Artzzle   All Rights Reserved

Thanksgiving … for the Kids

Hi All,

The next few days are all about those finishing touches for Thanksgiving. On the day itself, with all the adults talking over the cooking and eating, sometimes kids find themselves needing something to do, too. I played a while on the computer today and designed some cute print-ables just for them.

Artzzle.com

Just print this file THANKSGIVING PRINTS

Cut them out and they become either …

Artzzle.com
finger-puppets or …

Artzzle.com

pins for the kids.

All you need … besides scissors and a little time … is

Artzzle.com

1. White cardstock
2. Scotch tape … or
3. Adhesive Velcro dots

Artzzle.com

Just print and cut out the images. TIP: For puppets just remember to cut side strips that can fold to the back and be taped in a loop. They’ll fit over one finger for older kids, or two for the little ones.

For pins, one velcro dot goes on the back of the piece, and the other goes on the front of the child’s shirt. Voila you have a cute little pin.

Artzzle.com

Artzzle.com

Until next time, don’t stress, just start something.

And have a wonderful, safe and … HAPPY THANKSGIVING

Later – Cheryl

I love your feedback. Email readers can reply below and online you can click on the little cloud at the top of the article, by the title 🙂

This original article “Thanksgiving … for the Kids” appeared first on Artzzle.com.

No included content or photography can be used elsewhere without specific permission from said originators.

Copyright © 2013 Artzzle All Rights Reserved

Fun Finds Projects

Hi All.

Lots of fun finds are stacking up in my workroom lately, so today I experimented with two quick projects. I had a clear glass serving piece bought for $3.99 at DISCOVERY THRIFT in Milaca, MN and a $0.25 metal TV tray from Hand-To-Hand Thrift in Pease, MN.

The glass piece is divided into three sections and I knew I wanted to use it for a candy dish. I’ve had an idea for the tray for quite some time. It will be a chalk and magnetic message board.

Below is the finished candy dish.
OLYMPUS DIGITAL CAMERA

Here are the project details.

SUPPLIES
Glass piece
Clear or white contact paper
Spray Paint
Craft gloves (Optional but preferred)
Paper mask (Optional but preferred)
Exacto Knife
Scissors
Newspapers
Well ventilated, prepared and protected area for spray painting

1. I cut seperate pieces of contact paper, measured to cover the areas I will paint.

2. On the paper backing of my contact paper, I drew out shapes and designs that I wanted to show on the glass piece. My container has 3 individual sides; I drew stars, assorted triangle shapes and rectangles with roughly rounded corners.
OLYMPUS DIGITAL CAMERA

3. Still working from the paper side, I then used an exacto to cut and remove the individual shapes.
OLYMPUS DIGITAL CAMERA

4. Next, I carefully removed the backing paper from the contact front, and slowly adhered it to the outside of my bowl.
OLYMPUS DIGITAL CAMERA

5. Go slowly and smooth out any bubbles or wrinkles in your contact paper, as best you can. It’s important to have all edges around your open shapes, as tight and smooth to the glass as possible.
OLYMPUS DIGITAL CAMERA

6. Prepare your spraying area. I worked in the garage, with a window open and a ceiling fan on. The garage is heated so warm enough for painting. I secured a roomy box to a saw horse, then pulled it out into the room, where nothing would be hit by overspray. Here, you can see an outline of the TV tray I also worked on today, against the back of the box.
Artzzle.com

Shake your spray can vigorously for a minute or so, and begin.
Wearing your mask and gloves, hold the piece in one hand and begin to spray the sides.

TIP:
When spray painting, do light, quick sprays from side to side.
Spray … go just beyond your target, then release. Again, side to side, spray quickly and release. Don’t hold down the nozzle for a long time and continue to spray, you’ll start getting clumps and drips in your paint.

Artzzle.com

The paint I’m using today is Rustoleum Hammered Copper. If you notice what may seem to be bumps in the paint on my finished project, it is just part of this paint’s effect, to resemble the hammering. Ideally, I probably should have used just a regular color or metallic, but this is what I had available and in the color I wanted.

7. When finished painting, carefully place your vase on newspapers, and allow it to dry thoroughly.

8. When it is dry, carefully peal off the contact paper and reveal your design.

OLYMPUS DIGITAL CAMERA

TIP: It is nearly impossible to avoid overspray in the other areas of your piece. This has a bit on the bottom of the bowl, and some inside. I’m not too concerned about the overspray. My bowl is primarily for decoration and will hold wrapped candies. But I will probably attempt to use a touch of acetone on a cloth and wipe it out later. That should do it. And make sure if you are serving food in your bowl, that all the excess paint is removed from the inside, to avoid any contamination. Then carefully hand wash your bowl with sudsy water, before using.
TIP: ALWAYS HANDWASH your painted piece. Try not to use excess water on the painted surfaces; just a dampened cloth.

Artzzlw,com

I’ll post the TV tray project tomorrow.

As always, don’t stress, just start.

Later – Cheryl

This original article “Fun Finds Project” appeared first on Artzzle.com.

No included content or photography can be used elsewhere without specific permission from said originators.

Copyright © 2013 Artzzle All Rights Reserved

Reader’s Wreath

Hi All.

Here’s a short post today to share a shot of a reader’s project. This was made from our Wreath for All Seasons post tutorial.

This was made by some special Iowa readers; my step-daughter Cindra and granddaughter Brianna. They found their fabric at Walmart. It was one of those little scrap bundles for quilting. The bundle had several different patterns in colors they liked, so strips were cut, and they developed a design going around the wreath.

Reader's Wreath

Their wreath was done on a 9 inch frame. This was their first attempt and it was made to hang in Bri’s bedroom. The gals worked together and the project took just a couple of hours. It was so easy and fun, they’re going to do another one for the holidays! Send more pictures ladies.

Also coming up this week, Thanksgiving printables and some “fun find” projects.

As always, don’t stress, just start.

Later – Cheryl

This original article “Reader’s Wreath” appeared first on Artzzle.com.

No included content or photography can be used elsewhere without specific permission from said originators.

Copyright © 2013 Artzzle All Rights Reserved