Such a “girly” Girl

Artzzle.com

Gracie Mae is our “girly” girl.

Quite the fashionista . . . she’s always up with the latest looks.
ARTZZLE.COM
She absolutely adores white shoes . . . and has several pairs.

Gray and pink are trademark colors for Grace . . . in attire AND accessories. ARTZZLE.COM
That scarf goes so nicely with your gorgeous fur coat, Grace.

Leopard print is a fabric of choice so, she had a special throw designed. ARTZZLE.COM
Ooh, Gracie . . . how chic!

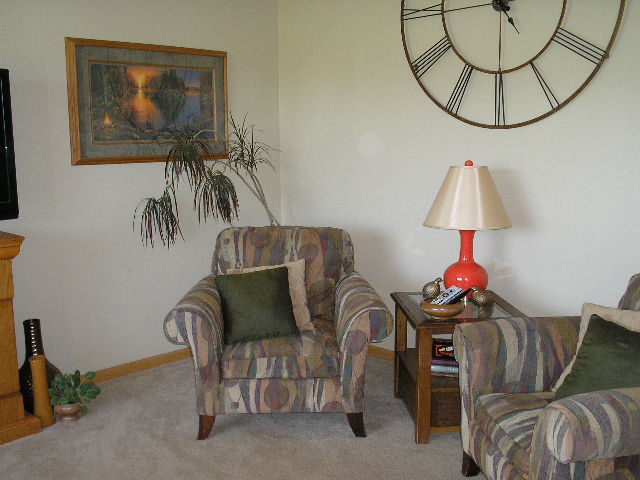
As a true Minnesotan, Grace loves every little bit of sunlight, so she puts her favorite chair right by the window. Clever arrangement here, as she can sun and attend to her important guard dog duties, simultaneously.
ARTZZLE.COM
Wonderful planning, GM.

Always ahead in the decor game too, our gal constantly surrounds herself with home style magazines, and loves all mom’s design books.
ARTZZLE.COM
Traditional Home is one of her most loved suscriptions.

SPECIAL NOTE HERE: The photo above had a second shot as well, with Grace laying on top of a pile of magazines. Unfortunately, it didn't turn out . . . because I climbed up into the upholstered chair to take it from a different angle . . . but all I took was . . . a terrible fall to the floor. In mid air, just as I said "Whew, I could have hit my head on the piano!" . . . I smashed my back into a metal based ottoman(with very little padding left on top).

LONG STORY SHORT . . . I cracked two ribs, and laid there on the floor, while calling Hubs home from work, for yet another ER trip. Positives to be taken from this. 1. I have sworn off climbing up on anything (at least when I’m the only one home). 2. This pain, while very uncomfortable, is much easier to tolerate than lower back and disk pain. Oh yes, #3. Hubs got off of work!

But now . . . back to Gracie’s story.

Grace is also very economical and environmentally minded. Her favorite toys are the tubes from TP and Paper towels.
ARTZZLE.COM
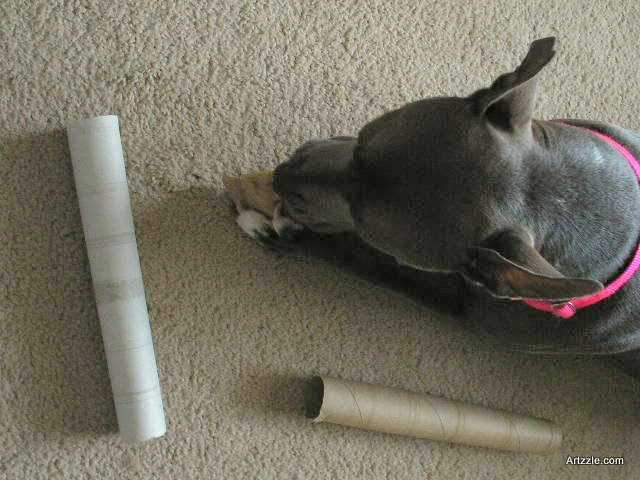
Good girl, GM . . . reuse, recyle!

But absolute proof of our “girly girl” claims . . .
Artzzle.com
Gracie Mae hates mornings!! AHhhh!

Artzzle.com
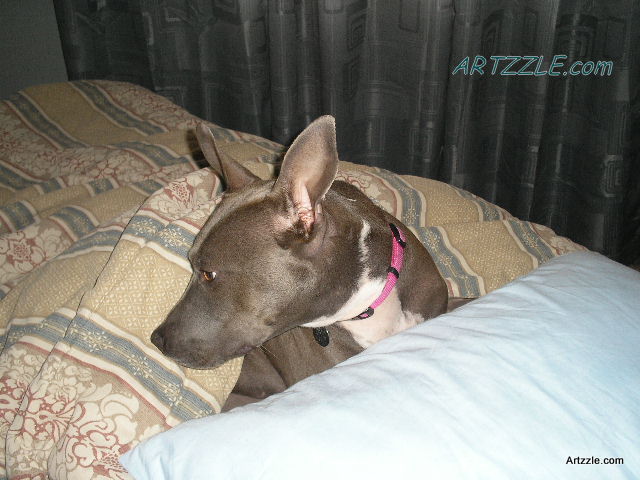
Every morning when she hears me coming down the hall . . .

Artzzle.com
she tries pretending she’s still asleep . . . thinking I’ll go away and leave her alone.

The ploy never works though.
Artzzle.com
Yah yah . . . OK . . . I'm awake."

But she doesn’t fret for too long . . .
Artzzle.com
. . . just finds another spot where the sun’s better anyway!

So there you have it . . . the tough and tragic life of Gracie Mae.

Being a good mom, not to be unfair and mean, one day soon, I’ll share Fozz’s routine.

Until then, stay safe, stay positive and . . . don’t stress, just start something.

Later – Cheryl

This original article “Such a “girly” Girl” appeared first on Artzzle.com. No included content or photography can be used elsewhere without specific permission and accreditation.

Copyright © 2013-2014 Artzzle All Rights Reserved

“To Do” . . or . . “Not To Do” that is the question

Hi All.

Hey, CONGRATULATIONS and GOOD JOB DONE . . . to those of you who have recently completed a wall painting project!

So is the new color fine, but you had a little more “umph” in mind? Consider this option next . . . Trims and mouldings.

Trim and moulding, even in small quatities, can instantly dress up a room, and give it a finished look. And it is something that beginners can do and afford, not just the seasoned DIYers.

True, you must be accurate in your measuring and cutting, but newbies can use straight cuts, butted, where as experience allows the more complicated mitered cuts and joints. And your pieces can be anything from inexpensive, primed MDF or pine that you’ll paint, all the way up to solid, finished hardwoods that you stain.

Let’s have fun looking at some wonderful examples from my HOUZZ files.

BEFORE YOU CLICK on the photo below,
just want to let you know . . . what happens next.

  • 1. Click on the photo below
  • 2. On 2nd screen – click that same photo
  • 3. On final (large) screen, click again on the photo to get to SLIDESHOW.

    Man, I hope this works! \:>)

  • Spring Arrived …but We’re Still Inside

    Hi All.

    Calendars say it’s Spring but weather has many of us still stuck inside . . . and our brains are fried . . . with boredom.  What I do for this malady, is rearrange, a lot!  It refreshes the spaces in your home and your mind. Best part is, it doesn’t cost anything!

    Just be careful with heavy stuff.  You don’t want any ER trips for a back out of whack.

    Today, I have hints on how to improve your furniture groupings.

    Let’s pretend you’re looking at one of your main living areas, and you think “it’s not so bad, I like my stuff in here.”  But there’s just a little something off and you wish you could fix it.    Consider the area below, a conversation area in an average sized living room.

    Nice things but they aren't communicating well.

    Nice things here so what’s wrong?

    Maybe because most of our first places are small, we want to push things out and use every inch of space when we graduate to bigger rooms. It’s almost a natural instinct, but spreading out dooms arrangements. The group above is dead because of the spread.

    Tighten Up

    Move pieces closer together, making it a more inviting arrangement.  Below, notice how we pulled the chairs closer together, angled them and centered things, table and all, under the wall clock.  This is a conversation area, but now you won’t have to yell across the room to converse!  Make your pieces communicate, so that your guests can too!.

    Tightening Up

    Add More . . . Sometimes

    YES . . . me, the “no clutter” freak . . . I just told you to add more stuff here.  Key word here is “sometimes”.  The solitary plant gets some company with another plant and vase.  And all are moved closer to the seating.   By using three items instead of the one lonely plant and positioning them beneath the picture, you create more interest and also better flow for the eye, connecting everything in your arrangement.  The blue keeps going with the second planter. We also added the matching ottoman for the easy chair.   I mean, what would you do with it otherwise?

    Okay, I did take away somethings – the picture was replaced with a larger, more color appropiate one.  And a table lamp is substituted for the floor lamp.

    Remember to always provide good lighting for every seating arrangement.

    More Easy Tricks

    OLYMPUS DIGITAL CAMERA

    Above, simply using a different lamp, and swapping the coordinating lounger for the matching chair, quickly gives you another look.

    Below, we added some toss pillows, changed back to the larger lamp and went to a bigger table.  Now this group will work for reading and/or TV viewing as well as conversation.  We’re beginning to experiment with the floor arrangment and try a third picture.

    OLYMPUS DIGITAL CAMERA

    Don’t Be Afraid to Experiment

    No Big Deal if something doesn’t work.   Here the plant behind the chair just doesn’t work, AND should be removed 2. The new “two” pillow colors and the added oranges in the floor group and the table lamp, DO work and now you have yet another change.

    TIP 1: In furniture arrangement consider communication and conversation. These might seem to be the same things but here, you want your furnishings to communicate, as well as your guests. Pulling pieces together avoids that isolated, disconnected look. Conversation is a given when more than one seating piece is involved, because you are inviting two guests to sit, and they’ll want to talk, so don’t make them shout by spreading things out.

    TIP 2: Comfort is always important, whether in a single chair grouping or a conversation area. Remember to include proper lighting and available table surface in any seating arrangement, for comfortable use. And angle chairs towards each other. Avoid pushing everything flat up against the wall.

    TIP 3: Use what you have. Everything doesn’t have to match to work together in a grouping. Use what you have and what you love.  Relate pieces through color, accessories and good arrangement. Sometimes the differences in pieces are what make the grouping interesting.

    Above all, have fun. Don’t stress, just start.

    Hey, I love hearing from you. What do you think? Leave a reply below . . . and let me know!

    Later – Cheryl

    This original article “Spring Arrived but We’re Still Inside”  appeared first on Artzzle.com. No included content or photography can be used elsewhere without specific permission and accreditation.

    Copyright © 2013-2014 Artzzle All Rights Reserved

    Another Easy “Inside Day” Project

    Artzzle Project Feature

    Hi All.

    Artzzle has been building for nearly a year already.

    This project was one of the first, and a favorite of mine. Now that I actually have readers and followers, I wanted to share it again. Thought it needed a little more attention.

    So ENJOY. And don’t stress about it, just start! This one is REALLY EASY.

    With all of the cold and snow of winter, we need lots of “inside day” ideas. This is one of my “Make Do” projects. That’s a – no store shopping, no spending, make do with what’s available -project. My office/studio needed a new bulletin board. So I shopped my house to see what materials I had on hand.

    Artzzle Project Feature

    My foam core supply was limited to a couple small sheets but my vision was a much larger board. No more cork rolls either, but in Hubs’ shop I found a huge section of cardboard … poof … a backer board! Nothing big enough in my fabric pieces box, but the remnants bin gave me two pretty options for the cover. And that old, faded quilt I had saved for some reason, was plenty big enough for the lining.

    The rest is easy, but just involves several steps

    • Measure the wall space and decide what size I want for the finished piece
    • Cut my cardboard to those measurements
    • My liner must be SMALLER than the backer so I subtract two inches from my measurements, EXAMPLE: My back board is 20″ x 40″ so I cut my liner material at 18″ x 38″.
    • Centering the liner on the cardboard; I have an inch of cardboard showing on each edge
    • Next begin taping the liner to a long side of the board

    Artzzle Project Feature

    • Once that edge is taped, pull it back and put glue all over the CARDBOARD surface
    • Pull the liner back over the glued cardboard and smooth it out

    Artzzle Project Feature

    Now TAKE A BREAK and let that dry for a bit. You can put a few heavy books on top to help press it down onto the glue.

    • Next finish taping the remaining three sides to the cardboard
    • Now measure the covering material and it needs to be BIGGER than the cardboard
    • I added four inches to give myself plenty of extra material to work with EXAMPLE: With our 20 x 40 example, we would cut our cover fabric at 24″ x 44″ (and trim later if desired)
    • I ironed my fabric, then spread it face down (the side you want to see on the finished piece)
    • Place your cardboard piece on top of this, so you’re now looking at the raw cardboard back, the liner is in between the finish fabric and your backer, and you see a border of extra front fabric around the edges.

    Artzzle Project Feature

    • Now begin the final steps, wrapping and taping the raw fabric edges to the exposed cardboard
    • I like to complete a long edge first, then put just a few pieces on each short side to help position and tighten the fabric
    • Flip it a few times to see how the front is progressing. You don’t want it too loose on the front, but don’t pul and stretch too tightly either
    • When you like how it looks, finish taping the short sides and then the final long one

    OLYMPUS DIGITAL CAMERA

    I hung the finished board using two inner screws and one at each corner.

    OLYMPUS DIGITAL CAMERA

    To cover the screw heads I glued some buttons and beads on top.

    OLYMPUS DIGITAL CAMERA

    Whew, that was a bit long, but it really was easy. Start to finish took about four hours.

    Hey, I love hearing from you. What do you think? Leave a reply below . . . and let me know!
    Later – Cheryl

    This original article “Another Easy “Inside Day” Project” appeared first on Artzzle.com. No included content or photography can be used elsewhere without specific permission and/or accreditation.

    Copyright © 2013-2014 Artzzle All Rights Reserved

    Thursday Thoughts . . . Just Sayin’ . . .

    HEY HEY . . . it's Valentine's Day

    ______

    Hi All.

    Wow, are you going to love the Thursday Thoughts post today. But first, I have to confess . . . my mini marathon wasn’t supposed to be quite as mini as it turned out. But it is SITS girls week and I have been so busy mailing out and answering back tons of comments. If you’re wondering “what the heck is SITS girls . . . find out HERE at this LINK.

    ______

    Anyhoo . . . on this Thursday, since I have been showered with so many great posts lately, I wanted to share just one or two of my favorites with you. Just sayin’ . . . they’re REALLY good so you should check em’ out.

    Photo Courtesy of Thistlewood Farms

    Photo Courtesy of Thistlewood Farms

    KariAnne over at Thistlewood Farms, has such a lighthearted, fun way of expressing herself. But this latest post touched my heart in a special way and brought back memories of two wonderful people in my life. I just had to send her a comment. I know you’ll enjoy her piece called “A LANGUAGE ALL THEIR OWN”

    ______

    Photo Courtesy of RTA Studios

    Photo Courtesy of RTA Studios

    RTA Studio’s blog SENSE OF PLACEsends me a little newsletter called “Knock Knock”. Whether an experienced homeowner, newly venturing into real estate or still in the daydreaming stage, you’ll find architect Richard Taylor’s insights and experiences fun and informative. As a former Real Estate agent, I enjoy keeping in touch with the “home industry” and his point of view is always interesting. This week’s piece is . . . The “Peanuts” Guide To Finding An Interesting Home.

    Photo Courtesy of RTA Studios

    Photo Courtesy of RTA Studios

    ______

    Truly, I follow some pretty great blogs. But there are always more out there to explore. Here’s one of my recent discoveries.

    There are those of us who know a little bit about a lot of things, right? Well, I’d say Cher with DESIGNS BY STUDIO C knows an awful lot about most any project she tackles. We found this article helpful.

    Ladies . . . even Hubs likes this site. It’s one we can enjoy together. Seriously, so check it out.

    Photo Courtesy of Designs by  Studio C

    Photo Courtesy of Designs by Studio C

    ______

    When you were a kid did you like the story of Goldilocks and the 3 Bears? Me – not so much. Don’t you think Goldy was a doofus to go snooping in a stranger’s house?

    Photo courtesy of Adventures of Goldilox

    Photo courtesy of Adventures of Goldilox

    Well, this week I discovered a Goldilocks that I do like, and I bet you will too.
    I found someone I could really relate to over at ADVENTURES OF GOLDILOX

    This Goldi is a military spouse (so was I), has a fantastic sense of humor (me too . . . well, at least I think so) and she seems willing to try just about any project (even more so than me). I couldn’t ask for more, but I bet you’ll like her too, so buzz on over there.

    ______

    Hey now, I have to sign off. Still have to finish my little Valentine Treat basket surprises for my neighborhood kids. I’ll post a pic of it soon.

    Oh yes, PLEASE & THANK YOU for visiting these blogs and telling them you found them at my place! It’s helps us both.

    Meanwhile, remember not to stress too much, just start that project!
    Later – Cheryl

    This original article “THRUSDAY THOUGHTS … JUST SAYIN’” appeared first on Artzzle.com. No included content or photography can be used elsewhere without specific permission from said originators.

    Copyright © 2013-2014 Artzzle All Rights Reserved

    Valentines Cards . . . EZ-PZ Make-do Project

    Don't forget to decorate and make matching envelopes

    Don’t forget to decorate and make matching envelopes

    Hi All.

    Today begins my mini-marathon of fun projects for Valentine’s celecbrations.

    Starting off with some very simple, make-do cards. Remember, my make-do projects are done with no extra shopping, just using what I have available in my stash at home. These turned out nicely.

    Here’s my SUPPLY LIST:
    1. Heavy card stock or construction paper for the actual card (8 1/2 x 11″ sheets)
    2. Pretty papers to decorate the card – here I used wrapping paper and paint sample cards.
    3. Decorative scissors and/or punches. I used both.
    4. Glue – I used both Tacky Glue and my Glue Wheel. The wheel is cleaner.
    5. Invitation size envelopes – I have these on hand, but you can purchase anywhere. Invitation size is 4 1/4″ x 5 1/2″.

    MAKING CARDS: Wrapping paper scraps, paint color and color range cards

    MAKING CARDS: Wrapping paper scraps, paint color and color range cards

    TIP: During my post-season shopping this year, I got some great deals on beautiful wrapping paper, in generic colors that can be used all year round. These cost $1.00 each a roll, opposed to the $4 – $5 seasonal price. So I got all five rolls for the price of one originally!

    Paint sample cards available FREE at any paint department or store

    Paint sample cards available FREE at any paint department or store

    Any store with a paint department has various paint sample cards and sheets and they’re FREE.

    Paint color range cards.  Use the colors seperately or cut shapes across two colors for a fun look

    Paint color range cards. Use the colors seperately or cut shapes across two colors for a fun look

    Decorative Punches.  You can also just cut out your own shapes.

    Decorative Punches. You can also just cut out your own shapes.

    INSTRUCTIONS are so easy.

    Take your sheet of card stock and cut it in half, so you have two pieces 5 1/2″ x 4 1/4″ diameters.

    A half sheet heavy paper (half of an 8 1/2 x 11" sheet) An invitation sized envelope (4 1/4 x 5 1/2")

    A half sheet heavy paper (half of an 8 1/2 x 11″ sheet)
    An invitation sized envelope (4 1/4 x 5 1/2″)

    Now BEFORE YOU MAKE YOUR PERMANENT FOLD, loosely hold the edges together and trim with a decorative scissors, cutting both at the same time. Or just fashion a design with regular scissors.

    1/2 sheet with top/bottom edges trimmed.

    1/2 sheet with top/bottom edges trimmed.

    Once trimmed, make your permanent FOLD. Here, I wanted a tongue fold but you can just do a normal 1/2 fold if you want. I like the tongue fold because the inside hangs out below in the front and you get to see pretty decorations on the inside as well as just the front.

    OLYMPUS DIGITAL CAMERA

    I sat for a time and just punched out various sizes and shapes of designs. Then I played with shapes and laid out various designs.

    Layout your design

    Layout your design

    Then just glue things on. I prefer a glue wheel, because it doesn’t get any overlap glue on the front of your card and decorations. But tacky glue works too, you just have to be more careful.

    Glue onto card with tacky glue OR a dry-glue wheel.

    Glue onto card with tacky glue OR a dry-glue wheel.

    Artzzle.com

    For your message, you can handwrite a message. I often use metallic colored markers for this. Or as in the picture below, I just type a little verse in a fun font, cut it out and pasted it in. I thought this card’s front looked like eyes in glasses frames and I had used stars so I said “Your Love has me Seeing Stars”.

    Inside, you can type up a little verser or write a message with a pretty marker (metallic colors are nice)

    Inside, you can type up a little verse or write a message with a pretty marker (metallic colors are nice)

    That’s it for today, but watch for another project soon.

    As always, don’t stress, just start that project.

    Later -Cheryl

    This original article “Valentines Cards…an EZ-PZ Make-do Project” appeared first on Artzzle.com. No included content or photography can be used elsewhere without specific permission from said originators.

    Copyright © 2013-2014 Artzzle All Rights Reserved

    AFTER’s . . . Results on Cabinet Project

    Hi All.

    Before I begin posting for my Marathon Valentine Week . . .

    HERE’S WHAT YOU’VE BEEN WAITING FOR … the remarkable results from our RUSTOLEUM Cabinet Transformation Kit. This is our bathroom cab’s and woodwork redo. See the HOW TO post on this project.

    FIRST a BEFORE reminder!

    B4 Bathroom Corner Cabinets

    B4 Bathroom Corner Cabinets

    Now, below is the AFTER. You notice that the plain, routed design is now covered in a nice trim detail, which was also added to the flat surface door.

    AFTER of bathroom corner

    AFTER of bathroom corner

    Going around the room here.

    Going around the room from that corner.

    Going around the room from that corner.

    The vanity really came out nicely

    The finished vanity cabinets

    The finished vanity cabinets

    We’re re-doing this room in stages. NEXT, we’re going to tackle the countertops, and finally, the lighting and mirror. Not sure yet what will be done with those, but I’ll keep you posted!

    Have a nice Sunday afternoon. See you soon with all those Valentine ideas.

    As always, try not to stress too much, just start something.

    Later – Cheryl

    This original article “AFTER’s Results on Cabinet Project” appeared first on Artzzle.com. No included content or photography can be used elsewhere without specific permission from said originators.

    Copyright © 2013 Artzzle All Rights Reserved

    B4 and Afters!

    We like seeing pictures on blogs … pictures … pictures … and MORE PICTURES, right!

    Some of the most popular and requested items are photos of Before and After’s. Today’s post has a bit different slant to the B&A idea. You’ll see during Christmas and then the afters, the January Jazzed-Up look. See what you think.

    NOTE: HOVER GALLERY PICTURES for CAPTIONS; CLICK for SLIDESHOW.

    The painting stayed in place and was left as-is. Often times, I wrap my larger art pieces in holiday paper to connect them to the rest of the décor. Such as in a previous season … below.

    A

    But remember, I had a minimal look going, so didn’t cover anything here. I was just less enthused this time … OK, yah … a little lazy!

    This corner shelf is always a “reader favorite”, wanting to see the newest displays there. Here are two holiday looks and the January display.

    Here are some looks at the cupboard tops. It’s hard to get everything into one picture.

    Holiday this past season.

    The Jazzed Up look isn’t too jazzy yet. Kind of bare, but I’m still in contemplation mode.

    The wall by the front door always has a display of three items.
    Two during various Christmas displays and the January look.

    Before I leave, did you happen to notice the new chairs in the living room? They’re “new-to-me” pieces that I found on Craigslist. Located in the south suburbs close to my son’s place, he picked them up for us. We took them home on our Christmas visit … and BIG SURPRISE … son & his lady made these our present (so no payment needed). Yay! Thanks.

    This last gallery will show you the entire LR from corner to corner, beginning in the SW corner with the shelves, and going to the right and around the room. The “new” chairs are on each end of the sofa.

    HEY, are you are curious about the price of those “new to me” chairs?
    Say yes … say yes! (It was UNBELIEVABLY low)
    Send me a reply in the comments section, and I’ll give you the low-down.

    Until next post, as always, try don’t stress but get started on something.
    Later – Cheryl

    This original article “B4 and Afters” appeared first on Artzzle.com. No included content or photography can be used elsewhere without specific permission from said originators.

    Copyright © 2013 Artzzle   All Rights Reserved

    Only One Resolution

    Artzzle.com
    Hi All.

    These New Year’s Wishes are late, but everything holiday was dismantled and packed away extra early. We had a nice lunch and afternoon with family during Christmas week, but it was not held here at our house. Nor was it the previous Christmas, and that made me a bit sad. Even though our decorations were minimal, everything was cleared and back to normal before January 1st. I did take time to sort and store items nicely though, because things were a mess from the previous take down! Now our crawl space looks great and everything is even labeled.

    So it’s January 2014. Besides being weeks of nasty weather, January feels like a “pushy” month to me. We’re always being pushed or pressured to do something. You know what I mean. Make resolutions … lose weight … organize … clean … yaduh, yaduh, yaduh. It’s on TV, in the papers, online and well, just about everywhere. “It’s a new year! Do this, organize that. Make that list of resolutions!”

    Well, even though being a dedicated list maker, I’ve only made one resolution this year.
    1. Never make another new year’s resolution ever again … NEVER.

    Admit it. We all know what we need to do, should do and want to do. And really, aren’t we all fairly sure about which of those will or won’t get done?

    EXACTLY.

    I’m officially making 2014 my “Trying” year … not trying as in perplexing
    but trying as in attempting.

    In 2014 I’m going to try to –
    Forget …………. YESTERDAY
    Not worry about …. TOMORROW
    Make the most of … TODAY
    Stay …………… POSITIVE

    My word of the year is “Simplify” and I’ll try to employ it in all possible circumstances.

    And as for lists, at this stage and age, I’m dropping a few, at least the long TO DO lists. Hey it’s time consuming to make those big old lists. Yes, it does feel good when a task gets crossed off. But if everything isn’t done by the end of day, it’s just frustrating and the guilt builds, cancelling any earlier accomplishments. No more long lists for me!

    So here’s my little NEW YEAR’S PROJECT.

    Artzzle.com

    Remember how I LOVE the color orange? Well, this little beauty popped right out while going down Wal-Mart’s clearance section. Just the right sized notebook, with a zipped storage pocket and three separated sections of paper. Even better, it had a $1 price tag.

    IRRESISTABLE. Had to have it!

    Now, following my 2014 plan, The book is titled Things of TODAY, and each section is simple as well.

    Artzzle.com

    1. Things DONE to jot down everything I accomplished that day. (It feels better to me, writing down what I did, not looking at what I didn’t do.)
    2. Things DREAMED. Here I note ideas, daydreams and little thoughts of the day.
    3. Things POSITIVE. I enter at least three positive events from the day; not accomplishments, but simple things … something that made me smile … a wonderful memory recalled … a phone call to or from a friend.

    Notebook and pen come out only once daily, in the evening while relaxing before bedtime.
    I have no rules or requirements, except to date each/any entry. If a day or two is missed, that’s fine.

    SO FAR … SO GOOD!

    How have you decided to approach 2014? Let me know. Thanks for stopping by and for sharing this with friends.

    As always, try not to stress, but just start something.

    Later – Cheryl

    This original article “Only One Resolution” appeared first on Artzzle.com. No included content or photography can be used elsewhere without specific permission from said originators.

    Copyright © 2013 Artzzle   All Rights Reserved

    A Different Feel to Christmas

    Hi, All.

    Yes, IT REALLY IS only two weeks till Christmas Day.

    Sounds like ours will a quiet holiday, just the two of us, with a small family celebration between the 25th and New Years. It was that way last year too, and just fine.

    The entire season seems somehow different this year. I’m not sure why. The cold and snow have been very severe quite early; Thanksgiving was later than usual; and a family member has been grouchy ever since. All of that may have contributed to this “off” feeling.

    Even after pulling out the many tubs of Holiday decorations from the crawl space, neither of us wanted to tackle any big projects.

    So … we didn’t.

    We long ago discontinued the hours of conquering snowy fields for just the right tree to cut. It isn’t as fun without children along. The cold got colder as we got older, and the trees seemed to grow more heavy and difficult to transport each year..
    OLYMPUS DIGITAL CAMERA

    Oh we still put a tree up this year. We have a very realistic and easy to assemble, artificial one now. There’s also a smaller, table tree in our family room that made the cut this year. Only because after last season, I wrapped it up in a big old plastic bag, ornaments and all, and found a spot for it on a garage shelf.
    Artzzle.com
    So … 1 – 2 – 3, it’s a done tree!

    Most everything else is minimal. Some that know me are shocked that I left the hutch as-is. It’s fine with just a bit of sparkle added here and there. Although, I spruced up the top a bit, placing this old yule santa next to the plants there.

    Artzzle.com

    Isn’t he adorable?  He was a gift from my daughter-in-law (to-be) last Christmas.

    For the table, DB brought a big glass bowl up. I washed it, added a live poinsetia plant, and filled around it with more sparkle.
    Artzzle.com

    The table covering is simply a long piece of wrapping paper for festivity, a remnant of silky green fabric for a little depth and texture, and a red plastic charger plate Jessica also gave me last year.

     Artzzle.com

    The big tree takes center stage in the living room, so the credenza moves to the hall wall. All I did here was … you guessed it … add some sparkle to an existing arrangement. I just used pieces in the vignette that tied in to the colors of the painting above.

    Artzzle.com

    I took a different direction in my office/workroom. I worked with the colors already there. More sparkle was added to the window group.

    OLYMPUS DIGITAL CAMERA

    Then after clearing my bulletin board, I prettied it up with similar colors.

    Artzzle.com

    Well, there ARE still two weeks to add a few more little things.

    Next post, I’ll share some “Make-Do”, pretty ideas … all done on NO BUDGET and VERY LITTLE TIME.

    Meanwhile, stay warm, stay safe … and don’t stress, just start!

    Later – Cheryl

    This original article “A Different Feel to Christmas” appeared first on Artzzle.com.

    No included content or photography can be used elsewhere without specific permission from said originators.

    Copyright © 2013 Artzzle   All Rights Reserved